Netgear_Ext is not appear in the Network list

Why does Netgear_ext not appear in the Network List?

Netgear_Ext is not appear in the Network list
There could be a lot of causes for your ‘Netgear_ext not showing on network list’ problem. Here are a few examples:
  • Your internet connection is moving at the speed of a turtle.
  • You did not properly configure mywifiext.net.
  • Your Netgear range extender’s firmware has not been updated.
  • The distance between your extender and router is excessive.
  • You have not turned on the network connection.
Now that you know why your extender’s Netgear_ext SSID isn’t showing up in the network list, follow the steps outlined below to resolve the problem. If you want to skip the reading and receive an immediate solution to the problem you’re having with your device, contact our professionals.

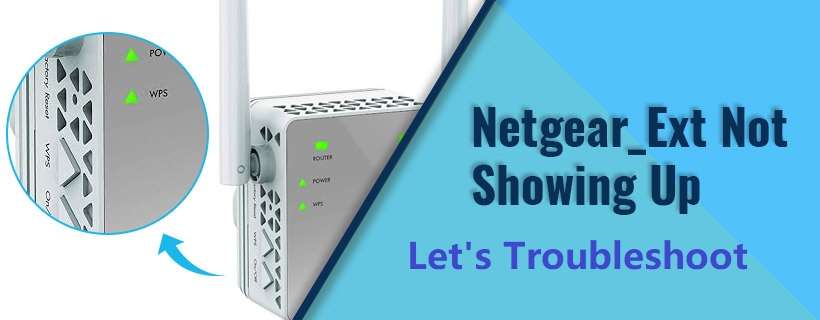
How to fix: Netgear_Ext is not showing in the network list.

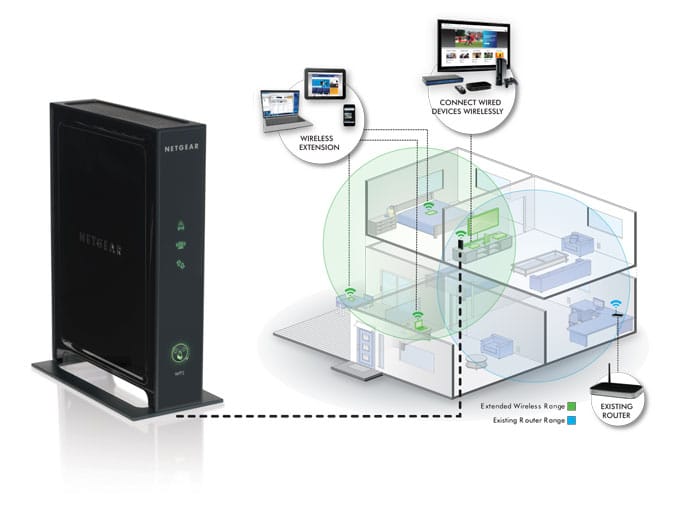
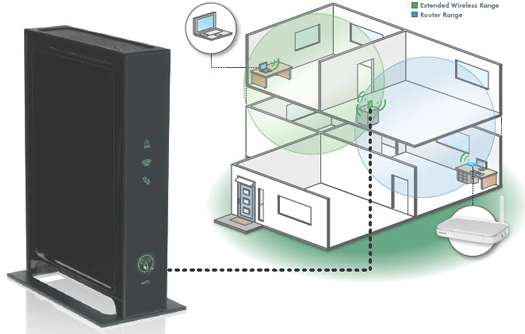
Close the gap between wifi devices (router and extender). To begin, measure the distance between your Netgear wifi range extender and your home router. Is it excessive? If the answer is affirmative, you now know where you went wrong. But don’t worry! reduce the distance between your wifi devices to resolve the Netgear_ext not appearing on the network list issue. Check that your wifi extender is within range of your router. Aside from that, make sure your gadgets have a solid connection.

Update the Netgear Firmware

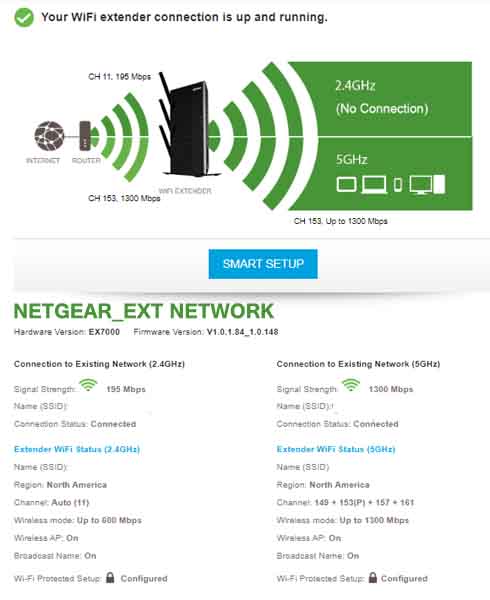
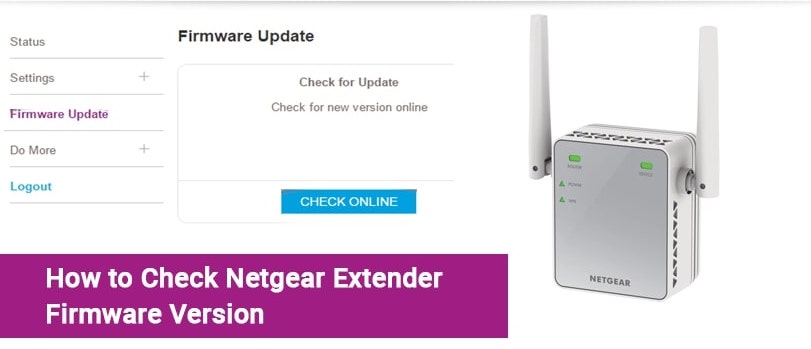
As previously stated, an outdated firmware may also be the cause of your extender’s Netgear_ext SSID not appearing in the network list. So, without further ado, upgrade the firmware of your wifi booster right away! The following are the steps you should take to upgrade the firmware on your wifi device:
  • Turn on your PC.
  • Launch a web browser on it.
  • Go to www.mywifiext.net or 192.168.1.250.
  • Press the Enter key.
  • Fill in the default admin information.
  • Click the Login button.
  • Go to Settings after you’ve logged in.
  • Select firmware Update from the administration menu.
Once you’ve finished updating the firmware on your Netgear wifi extender, check to see if Netgear_ext is included in the network list. Still no joy?

Activate the Network Connection

Enabling the network connection may also assist you in resolving the problem you’re now having with your Netgear wifi range extender. To enable the network connection, perform the following steps:
  • Navigate to the Network adapter settings option.
  • Right-click on the SSID (network name) you want to use and select Properties.
  • After that, select Enable.
You’ll be able to eliminate at least one reason why your extender’s network name isn’t displaying on the list in this method.

Setup Your extender accurately

If nothing has worked so far, it’s most likely because you made a mistake during Netgear extender setup procedure using mywifiext.net. Thus, properly install your WiFi equipment while keeping the following considerations in mind:
  • All cable connections must be finger tight.
  • Make sure you’ve updated your web browser before logging in to your Netgear extender.
  • Avoid inputting the default login credentials incorrectly. Contact us if you are unsure of your device’s default username and password!
Let’s hope the troubleshooting tips in this post helped you resolve the ‘Netgear_ext not showing on network list’ issue. If you’re stuck with the same problem, our professionals are here to help you 24 hours a day, 7 days a week.
wireless mesh network

How to create a wireless mesh network at home?

How to create a wireless mesh network at home?

Do you have problems with your internet connection? The best way to solve the problem is to create a wireless mesh network with your current router. If you don’t know how to set up a wireless mesh network using an existing router, this guide may be of great assistance. So, before we get started, let’s first get you acquainted with Netgear Mesh WiFi Systems.

wireless mesh network

What are Netgear Mesh WiFi Systems?

Mesh system

Netgear Mesh WiFi Systems are the one-stop solution for enjoying lightning-fast internet across your home. Even after setting the router and performing the Netgear range extender setup, users may experience internet problems in certain regions of their homes. If you have dead zones in your house, creating a wireless mesh network with your existing router can work miracles.

The best mesh wifi will allow you to transform your home’s dead zones into entertaining zones. Mesh systems, which use advanced technology, are essentially offered to improve your Wi-Fi connectivity and elevate your internet-using experience to the next level. To reap all of the benefits, though, you must properly configure your Mesh network wifi at home.

Install WiFi mesh with an Existing Router

Please keep in mind that the instructions outlined below are for generic models. However, the processes may differ depending on whatever Mesh WiFi system you use.

Start by connecting the mesh system

Begin by putting your system’s power cord into a functional power socket to configure your Netgear Mesh WiFi with the existing router. After that, use an Ethernet cable to connect the Mesh system or nodes to your existing router.

Quick Tip: Make sure your Mesh WiFi system’s nodes (particularly the primary node) are in the correct location. Otherwise, you may encounter difficulties when configuring your Mesh network WiFi with your existing router. As a reminder, the primary node of your Mesh system should be located near your existing home WiFi router.

Install the Netgear App

When you have finished connecting your devices, go to the App Store that is compatible with your smartphone’s operating system and download the Netgear app.

Create a Netgear account and log in to your router to continue. After that, the software will walk you through the process of configuring your Mesh system.

Set Up Your wireless Mesh network

The program will now search for your Mesh system’s parent node. You will be notified as soon as the app detects the node. Take note that the node of your WiFi router will be assigned an IP address automatically.

The next step is to give your network a name and a password. Ideally, the same credentials should be assigned to both WiFi bands. Some systems, however, require a distinct password for the 2.4 and 5GHz bands. This is how you configure the nodes in your Mesh system.

Begin Changing Settings

Once you’ve finished configuring the Mesh network wifi with your existing router, you can begin modifying the Mesh’s settings to suit your needs. However, in order to get the most out of your WiFi system, keep the following factors in mind:

  • Never put your Mesh WiFi system’s nodes on the floor. Place them on a tabletop or higher surface instead.
  • Make certain that the Mesh system nodes are close to a working power socket. This eliminates the need for access to an extended cable.
  • Maintain a minimum distance of 30 feet between your nodes.
  • Place the nodes outside of a cupboard or under a table.

Finishing up

That was all about creating a wireless network with an existing router. We expect that the guidelines in this blog will assist you in configuring your Mesh without difficulty. Please keep in mind that if you encounter any problems while carrying out the process, you can contact our technical experts for rapid assistance. 

For more information:

mywifiext.net setup

Netgear extender Default ip address

netgear Extender setup

The Best Techniques for Increasing Netgear Extender Weak Signal

The Best Techniques for Increasing Netgear Extender Weak Signal

netgear Extender setup


A lightning-fast internet connection has become necessary for survival, much like water and electricity. Perhaps this is the reason why many customers put up Netgear extender setup in their houses. However, the WiFi network can occasionally become incredibly unreliable. That means that the network speed of your Netgear extender may change significantly from day to day. Or perhaps it will never ever achieve the claimed speed. The good news is that by using the advice in this post, we can help you improve the weak signal on your Netgear extender. Read on.

How to Improve a Weak Signal on a Netgear Extender

  1. Verify Your Connection

Check the medium of Netgear extender Setup and the host router before taking any further action to improve the weak signal. Are there wires? So that’s the reason you’re not getting the speed you want.

Be aware that while there is nothing wrong with connecting your devices to this source, it cannot be trusted 95 out of every 100 times. Therefore, what good is employing it if you desire constant access to seamless internet?

As a result, it is advised that you connect the devices using an Ethernet cable. Just make sure the connection is firmly fastened.

  1. Update the firmware on the extender

Every Linksys extender has software built in that checks its operation. The firmware is the name given to this software. Your device’s performance will start to decline if updates are not made in a timely manner.

In light of this, it is advised that you update your device’s firmware to the most recent version in order to improve the weak signal of your Netgear extender Setup. With the aid of the following recommendations, you can:

  • Connect your extender firmly to the router.
  • Obtain access to your device (laptop or computer).
  • Open Google Chrome if you typically use it.
  • Head over to the URL field.
  • Put mywfiext.net, the default web address, in the URL field.
  • Press Enter.
  • Soon, you will be taken to the login window.
  • Under the Password field, enter the password.
  • Do the same with the default username of your extender.
  • Hit Log In.
  • Go to Administration and select the Firmware Update button.

Within some time, your Netgear range extender will get updated to its latest version. Got stuck at some point? Get in touch with our technical expertise. They will assist you figure out where you went wrong and what you can do about it. Plus, they will throw light on many other strategies by which you can increase Netgear extender weak signal.

  1. Relocate the Netgear Extender

Bluetooth speakers, cordless phones, refrigerators, microwave ovens, washing machines, baby monitors, treadmills, and televisions are broadcasting items that can disrupt or block the signals emitted by your Netgear extender.

As a result, you must discard these appliances. Do you have any idea how to do that? It’s really quite easy. All you have to do is move the extender from where it is now.

  1. Closer WiFi Device Pull

The signals from your Netgear extender will inevitably deteriorate if it is not kept within the router’s coverage area because it won’t be able to broadcast them effectively. So, think about closing the gap between the two gadgets.

But bear in mind that placing your extender and router too close together is not a good idea. Otherwise, their signals can interfere with each other.

  1. Unplug additional devices

Perhaps there are many more devices accessing the network of your extender than just one, two, or three. Consider the possibility that your Netgear extender’s WiFi signal will deteriorate if it is being shared among more devices than it can support.

We advise you to turn off every additional device connecting to the network of the Netgear extender in order to solve this issue.

Wrap up

It’s challenging to maintain a connection to the digital world when the Netgear extender’s signals deteriorate. We trust that after following the advice in this post, you were able to improve the weak signal on your Netgear extender without any problem.

Take our advice and get in touch with our technical experts if you still need assistance enhancing the WiFi on your extender. We assure you that they are accessible 24/7, whether you ping them during the day or at midnight.

Netgear Extender Setup

Netgear_ext

Netgear_Ext Setup

After completing the Netgear WiFi extender settings, you will be given the expanded SSID, Netgear_Ext. To rejoin your WiFi range extender through WiFi.

Follow these steps:

  1. Restart the range extender.
  2. Connect to the NETGEAR_EXT SSID, the extender’s default WiFi network.
  3. Start your computer’s web browser.
  4. Enter mywifiext.net into the address bar of your web browser.
  5. Enter or click the Search button.
  6. The login page appears.
  7. Enter your e-mail address and password.
  8. Follow the on-screen instructions to reconnect your extension to your home network.

If your router employs WEP security, enter the Netgear ext (SSID) and password when requested.

New Extender Installation Requirements

The Netgear range extender setup process is extremely simple. But, before you begin with the Netgear Extender Setup, you must have the following items on hand:

  • The proximity of the extender to the router. The extender and the existing WiFi router should be placed in the same room.
  • The WiFi range extender requires a steady and fluctuating power supply from the wall socket.
  • Then, throughout the Netgear Extender Setup process, you must have access to a high-speed internet connection.
  • Following that is an internet browser. It is recommended, however, that you install more than two web browsers on your computer or laptop.
  • It is possible that you are unable to access the default Netgear Extender Login page due to a problem with your web browser. In this case, you can use another browser (you have options!).

Once you have all of these items, you are ready to begin the Netgear Extender Setup process.

How to access to Netgear_Ext ssid: Guide

NETGEAR_EXT

To access the wireless network, follow the steps mentioned below: Now, wait until the status of the power LED image indicates a green signal. Here, the default name of your wireless extender network is Netgear_ext. The following manual discusses major problems that you can experience during the setup process. You may follow these clear instructions to install your computer and configure it without any trouble.

  • Restore your wireless device to its factory default settings.
  • Now get connected through a WiFi connection to the computer.
  • You will now be prompted to fill in the username and the default password for Netgear_ext.
  • You can contact us using the chat window at the bottom of this page if you need help with your 192.168.1.250 Netgear extender device.
  • Next, carefully follow the installation prompts of mywifiext.net login for local IP address 192.168.1.250 and create a strong connection to your current router.
  • Now, all your WiFi devices are connected to the network you have just installed.

Connect your WiFi devices to the Netgear extender once more.

Still having trouble configuring your Netgear WiFi Extender?Don't put off contacting our skilled and trained professionals. We will gladly walk you through how to set up a Netgear WiFi extender and assist you in troubleshooting and resolving Netgear WiFi extender setup issues in a matter of minutes. Furthermore, we use cutting-edge remote PC tools to handle any of your technical concerns in real time. Simply contact us to be free of problems with your Netgear booster setup.

Netgear Ext is not Showing Up in the Network List? 


Don’t you despise it when the name of your Netgear extender isn’t displayed in the network list? If you answered yes, then it’s time to relax those worry lines on your brow because our experts are here to assist you. In this blog post, we’ve discussed the most common reasons why your Netgear text isn’t showing up in the network list, as well as solutions to the problem. So, what are you holding out for? Let’s get this started.

NETGEAR_EXT

Reasons Why Netgear_Ext doesn’t appear in the network list

There could be several reasons why your WiFi range extender’s name isn’t showing up on the network list. Some of the most important contributing factors are as follows:

  1. Inadequate internet service
  2. Network connection has been disabled.
  3. Installation of a partial extender
  4. Firmware that is outdated or corrupted
  5. The distance between the extender and the router is measured in kilometers.

Now that you know what might have caused the problem, let’s look at the various ways to troubleshoot it.

Why is my smartphone not connecting to Netgear_Ext?

Netgear EX6150 firmware update

Netgear range extenders have simplified everyone’s lives by providing consumers with a stable internet connection.

All you have to do is connect your wireless devices to the extender’s Netgear ext and you’re ready to go. But what’s the deal with the stress lines on your brow? It appears that you are having problems with your Netgear WiFi extension. Is your smartphone unable to connect to the network of the extender? If you answered yes, we’ve got you covered.This article will provide you with several ideas and tricks for quickly resolving the problem. So, roll up your sleeves and continue reading.

Resolved: Smartphone Isn’t Connecting to Netgear Ext

Method 1: To begin resolving the issue, reboot your Netgear WiFi extender. Perhaps your WiFi device has had minor faults that have resulted in the problem you’re currently experiencing. Fortunately, you can remove them simply by restarting your extension.

Consider turning off your wireless extender, letting it rest for a time, and then turning it back on. Once your Netgear range extender has rebooted, check to see if you are still having problems connecting your smartphone to the extender’s Netgear_ext2.4Ghz or Netgear_ext_5Ghz.

Quick Tip: Technical issues can also affect your smartphone. As a result, consider resetting your mobile device as well.

Method 2: Do you have a lightning-fast internet connection? Most likely not. Your internet connection may be disrupted owing to a faulty connection between the extender and router or a problem on the end of your ISP. So, first, check the connection between your WiFi devices. Bring them closer if they are too far away. If possible, use an Ethernet cable.

However, if the connection between your Netgear extender and router is stable, our second assumption may be correct. As a result, call your ISP to see if the problem has occurred on his end. Give him some time to rectify the problem if he accepts that it is his fault.

Netgear_ext common issues

Users frequently report problems with their Netgear extenders. The following are some of the most common Netgear extender problems:

  • The extender is not turning on.
  • Red light on Netgear powerline extender.
  • The WiFi extender is getting hot.
  • Ping is being caused by a WiFi extender.
  • Password for Netgear extender login has been forgotten.
  • IP address 192.168.1.250 is not working.
  • The 5GHz Extender is not working.
  • Flashing orange light on the extender.
  • Two extenders cannot be connected.
  • The Extender is not connected to the PS4.
  • Netgear extender reduces download speed.
  • WiFi extender prevents access to websites.
  • Extender is unable to connect to the router.
  • The Netgear extender is constantly disconnecting.
  • WiFi extender is unable to connect to the internet.
  • The Extender LED continues to blink.
  • The password for the Netgear extender is not accepted.
  • mywifiext.net does not respond.
  • The Netgear extender is unable to locate an IP address.
  • The WiFi extender is not working.
  • Connection problems with WiFi extender.
  • WPS red light.
  • WiFi extender not found.

Please contact our experts if you are experiencing any of the aforementioned problems. They are working around the clock to ensure that you have a fantastic experience with your extender.

NETGEAR EX7700 setup

Netgear EX7700 Setup

Netgear Nighthawk EX7700

Netgear EX7700 Setup guide: Fighting dead zones in your residence? Getting quick internet access in your living room but no internet connectivity in the backyard anymore? Netgear extenders or Mywifiext allow incoming wireless signals through your existing home network and then enhance them to every corner of your house. Generally, the Netgear Extender acts as a link, taking WiFi from your router and rebroadcasting it around your home.

So, here you’ll read about the different methods for the Netgear EX7700 extender setup for your local area and troubleshooting tips to just get rid of all concerns during installation:

NETGEAR EX7700 setup

Netgear EX7700 Setup | AC2200

Netgear Nighthawk Extender

Step-by-step instruction for Netgear EX7700 WIFI extender setup:

  • To begin the Netgear EX7700 setup, plug your extender into a power outlet.
  • When you see the power led light on the EX7700.
  • Access any WIFI-enabled device, such as a wireless desktop or laptop computer.
  •  Now, from the WIFI settings menu, connect your device to Netgear ext.
  • Once connected, open a web browser i.e. Mozilla Firefox or Google Chrome.
  • Type www.mywifiext.net on the address bar of the web browser.
  • Netgear EX7700 mesh extender setup screen appears on your laptop or desktop.
  • Follow the steps to link your AC2200 to your existing WIFI network.

How to configure my Netgear EX7700 WIFI range extender?

To setup Netgear EX7700 Nighthawk X6, follow the steps given below:

  • Plug the EX7700 extender into an electrical socket.
  • To begin the setup, wait until the Power LED on the Netgear AC2200 turns white.
  • From a computer or a mobile device, open a web browser and type in “mywifiext.net” 
  • You are now Netgear EX7700 installation page.
  • Follow the on-screen instructions in order to configure the extender.
  • Unplug the WIFI booster and place it where you have a weak WIFI connection.
Netgear EX7700 mesh extender setup

Netgear EX7700 Firmware Update | AC2200

Netgear EX7700 Setup

To update your Netgear EX7700 AC2200 range extender’s firmware, follow the steps below:

  • Switch on your Netgear Nighthawk X6 AC2200 EX7700 first and foremost.

  • Connect the Nighthawk EX7700 Mesh Extender to your router.

  • After that, open your preferred web browser.

  • In the address bar, type mywifiext.net and click Enter.

  • Type the username and password to log in to your Netgear X6 AC2200.

  • To upgrade the firmware, go to the Settings menu and choose Firmware Upgrade.

  • After that, press the check button.

  • If a new firmware update is available, select yes to upgrade the firmware.

  • Now wait a while for the Netgear EX7700 firmware to update properly.

That’s the case. The firmware on your Netgear EX7700 Extender has been modified. Feel free to contact our experts if you run into any probl

Netgear AC2200 | Common Issues

  • No light lit up on the Netgear EX7700.
  • Unable to setup Netgear AC2200 using 192.168.1.250
  • Mywifiext.net is not opening up.
  • The WIFI extender is connected but has no internet connection.
  • Forgotten the login Id username and password to access the genie setup page.
  • Unable to log in to Netgear EX7700 Setup page.
  • Can’t install the Netgear AC2200 firmware.

For more information and troubleshooting:

Netgear AC2200

Netgear AC2200 Nighthawk X6 Fastlane Setup

Netgear AC2200 Tri-band Extender setup

Here’s how a user can setup Netgear Mesh X6 AC200 with FastLane Technology:

  • Connect the Netgear AC2200 Nighthawk extender to your WIFI device.
  • Open any web browser, such as Microsoft Edge, Google Chrome, or Internet Explorer, as an alternative.
  • In the address bar, type www.mywifiext.net.
  • Enter the username and password for Netgear EX7700 Login page.
  • Wait until the Netgear EX7700 Nighthawk Setup page appears.
  • Click on ‘Do More’ option, then on the ‘FastLane’ option.
  • Configure your Netgear Nighthawk AC2200 with Fastlane and press the save button.

If you get stuck while enabling FastLane Technology on your extender, don’t hesitate to contact our experts for help.

How to install Netgear EX7700 Mesh Extender with WPS?

  • To setup Netgear EX7700 Nighthawk X6 AC2200, firstly plug it to an electrical outlet.
  • For EX7700 Mesh WPS Setup, the router or modem should also have the WPS button.
  • The extender should be near to the main router.
  • Wait for the AC2200 Nighthawk power LED to turn green.
  • Now press the WPS button on the Netgear X6 wireless booster.
  • And then push the WPS button on the main router.
  • If there will be blinking lights on both devices. It means the devices are connecting with each other.
  • Do not turn off or unplug any device while AC2200 Mesh setup.
  • Once the WPS led stop blinking on both devices.
  • Look on the Nighthawk, if you have all solid lights on the extender. Your Netgear EX7700 Range Extender Setup using the WPS button is completed.
  • Place the extender to the desired location and enjoy great connectivity.

if you are facing any problem installing the wireless booster, get in touch with our certified expert who can guide you to Netgear AC2200 Extender Setup

Netgear Wn2500 setup

Netgear EX6920 Setup

Netgear EX6920 Wifi Extender Setup

Quick installation guide to login to Netgear EX6920 setup page. Make sure your WIFI AC1200 device is close to the main WIFI router or modem before configuring it. The EX6920 is designed to work with any wireless network or modem. And the simple installation instructions allow you to connect your wifi booster in no time.

Netgear Wn2500 setup

How to Access the Netgear EX6920 Setup page:

Netgear EX6920 setup , Netgear produces a wide range of extender and ex6920 Extender they recently launched it in the market which is a favorite extender of the customer cause it provides even more coverage, with two range extender. AC1200 plug-in wifi boosters are small and secretive which easily mixing inside your home decor. It is compatible with any standard router and perfect for HD video streaming and gaming.

  • The extender should be plugged into the power outlet.
  • Netgear Extender and Router need to be closed for the initial setup.
  • There must be only one solid green light on the Netgear device for the first-time extender installation.
  • Grab any wireless device like your smartphone, tablet, computer, or laptop and go into the wifi setting and connect your device with Netgear_EXT Network.
  • Open your preferred browser and search for mywifiext.net or use default Netgear IP Address: 192.168.1.250.
  • It will open the Netgear Genie Smart Setup page where you will see the instructions guide.
  • Select your Home Wi-fi Network and hit next on the Netgear EX6920 setup screen.
  • when it asks for a password use the same wifi password which you use to connect with your existing wireless network. Follow all instructions carefully till you see all lights on the extender green.

Table of Contents

Netgear Wn2500 setup

Click here for more information about:

Netgear EX6920 Setup with the Netgear installation assistant

Steps to configure EX6920 extender:

  • Use a Wi-fi-enabled device to connect with the Netgear_ext network.
  • After you are connected the device LED on the Netgear EX6920 will turn Solid green.
  • Launch a Web browser and visit www.mywifiext.net to complete the Netgear EX6920 setup.
  • Now you will see the New Extender Setup button, which you need to click on.
  • You will have to create your login credentials now to proceed further.
  • Select the Wi-Fi Range extender option now.
  • EX6920 will look for the Wi-Fi router that you have, you need to select it from the list.
  • Hit Next and it will ask you to create a password.
  • From here you should just go through the on-screen instructions to complete the setup for your EX6920 Setup.

Note: Unplug the extender and relocate it halfway between your router and the region with a weak router WiFi connection. You must choose a place that is within range of your existing WiFi router network.

How do you Login to Netgear EX6920 After Installation?

After you’re done with Netgear EX6920 installation, you can login into the Web interface of your EX6920 Wi-Fi Extender to view or manage the settings.

To login into Netgear EX6920:

  • Take one of your computers or a Wi-Fi-enabled device and connect it to the EX6920 extender network.
  • After the connection is established the device light on the Netgear EX6920 will light green.
  • Open a Browser like Google Chrome or Edge.
  • Now type on the address bar www.mywifiext.net and the login page will appear on your screen.
  • Enter the Username & Password to login into EX6920 extender.
  • If you don’t know the credentials for your extender, you may reset it using the forgot password option.

If you go through directions carefully, you will be able to access Netgear EX6920 GUI in quick seconds. Still, you need any help get in touch with our support.

Netgear EX6920 setup

Functions of Netgear EX6920 LED Light indicators:

Solid Green: Indicates extender is in the Best connection.
Solid Amber: Indicates Extender is in a Good connection.
Solid Red: Indicates Poor connection
Extender Light Off: Indicates No connection from the power.

Netgear EX6920 features:

  • Boost WiFi Enhance the distance of your existing WiFi network.
  • External Antennas gives excellent WiFi coverage.
  • Concomitant Dual Band WiFi Extend 2.4 & 5GHz WiFi up to 1200Mbps & reduce signal problems.
  • FastLane™ Technology establishes a super high-speed connection; Netgear extender setup and Netgear genie setup help you to monitor the connected devices.
  • Ethernet Port Attach a lined device like a smart TV or game console to your WiFi network.
Netgear extender setup

What are the installation steps for Netgear EAX80?

Netgear EAX80 Setup

Netgear EAX80 Setup | This high-capacity, high-speed Nighthawk AX6000 Mesh Repeater is designed for the coming years of Wi-Fi, giving maximum capacity, speed, and coverage. With blazing fast connections up to 6Gbps, you can have a better connected home experience and extend faster Wi-Fi to the farthest part of your home

netgear eax80 setup
Netgear EAX80

How to configure my Netgear EAX80 WIFI extender AX6000?

  • To setup Netgear EAX80, start by plugging the repeater into an electric outlet.
  • Once you see the power led light on the EAX80 extender.
  • Use any laptop or a tablet and go to the wireless option on your device.
  • There you have to connect with the “Netgear_Ext” network.
  • After connecting to the extension WIFI. Open any web browser.
  • And type www.mywifiext.net on the address bar.
  • You are now on the Nighthawk new extender setup page.
  • To connect your booster to your wireless router or modem, follow the on-screen prompts.

Attach your PC or smartphone to the new Netgear eax80 ax6000 extender.

Netgear Nighthawk AX6000 Guide

The Netgear Nighthawk AX8 8-stream AX6000 EAX80 WIFI 6 mesh extender offers up to 6Gbps WIFI speeds. You can enjoy quick online gaming, seamless HD streaming, and buffer-free music streaming in your home or office. 

If you don’t know how to setup Netgear EAX80 Nighthawk AX8 AX6000 WiFi 6 extender, you’ve come to the right place. Here you can learn how to set up your Netgear AX8 WiFi 6 mesh extender in its entirety. 

Netgear AX6000 Mesh Extender Setup | EAX80

Here we are talking about what to do next when you are on the Netgear EAX80 setup page to connect the extender to your wireless router or modem. 

Manual step by step instruction to how to create an account and setup AX6000 Mesh to the home wifi network.

  • When you are on the www.mywifiext.net page. Click on the EAX80 new extender setup button.
  • You will now see a create an account page. Fill all the required fields.
  • And click on “Continue“. It will now ask how would you will like to setup Netgear AX600 WIFI mesh extender.
    • WIFI RANGE EXTENDER
    • Access Point
  • Choose any one of the option and click on “NEXT
  • Now your EAX80 WIFI MESH AX6000 searching for the available wireless connection.
  • You will now see your home wireless network name on the list.
  • Choose your home WIFI name by clicking on the radio button and tap on “NEXT
  • Enter your home network password and hit on “Continue
  • Now please wait for 2-3 minutes while your repeater and router will communicate with each other.
    • Note: Do not unplug or turn off the booster while setting process is going on.
  • Your Nighthawk is successfully connected to your home system.
Netgear wn2000rpt

That’s how to get your Netgear Nighthawk AX6000 AX8 EAX80 WiFi range extender up and running. You will now unplug the extender and transfer it across your house or workplace. Link all of your WiFi-enabled computers to the latest, expanded WiFi network to get high-speed internet.

Netgear EAX80 Setup | WPS Method

Netgear Nighthawk AX8

Have you found the above-mentioned Netgear EAX80 configuration process to be difficult?

Don’t be concerned! For Netgear extender Setup, use the WPS system. The below are the measures to use the WPS push button to mount your Netgear Nighthawk AX8 8-stream AX6000 EAX80 WiFi 6 extender:

Netgear EAX80 Mesh Extender setup via Nighthawk App

  • Firstly install the Nighthawk application on the smartphone.
  • A user can download the application from Apple app store or from Google play store.
  • Create an account for setup Netgear EAX80 extender.
  • Now to connect the repeater to your existing router or modem.
  • Obey all the prompt step by step on your your app.
  • Once you successfully installed your booster.
  • You will see all led light lit up solid white.
  • Unplug the repeater and move it to the desired location.
Mywifiext.Local

Netgear EAX80 AX6000 | Firmware Update

  • Open up any web browser from laptop or smartphone that is attached with the Netgear EAX80 extender network.
  • Now, you have to login in either of these:
    • Windows Operating system use mywifiext/ or mywifiext.local/
    • For Apple or Linux or IOS system use mywifiext.local/
    • Android system use your Netgear’s IP address
  • Type in admin ID and password and tap on LOG IN option displayed.
  • Whether the browser shows the Menu option, tap on it.
  • Choose the Firmware Update option.
  • Tap on the “Check Online” option.
  • Whether any new update is available, follow all the steps to upgrade your Netgear AX6000 extender firmware.

How to log in to Netgear EAX80 settings page?

  • Open up interent browser from any laptop or smartphone that is attached with your Netgear eax80 ax6000 network.
  • Enter in mywifiext.net in the website field of internet browser.
  • Tap on the Enter option.
  • Type in admin ID and password when prompted to.
  • Tap on the LOG IN option.
  • Whether internet browser shows the Menu button, now tap on it.
  • Choose the Settings option to open it and change the Netgear extender configuration.

Netgear EAX80 AX6000 trouble shooting steps

  • When you attach your laptop or smartphone to the Netgear ax6000 eax80, always check that Netgear extender’s Client Link light turns white.
  • Whether you don’t remember your ID or password, tap on the “Username & Password Help” option.
  • Whether interent browser shows an error page, put in “http:// “in the website bar of internet browser by putting in this “http://www.mywifiext.net”.
  • Whether your Netgear ax6000 is configured but coudn’t attach with the main Wi-Fi network, make sure that whether the Client Link light is off.
  • Whether you can’t have WiFi connection stable, take any Ethernet cable to attach to your PC to Netgear ax6000 eax80 extender.

If you still face any trouble regarding your Netgear Nighthawk Setup login page , you can still login via default login IP address i.e 192.168.1.250.