Step-by-step guide for Netgear Orbi AX6000 setup
Step-by-step guide for Netgear Orbi AX6000 setup Your experience with a smart home is raised by the WiFi 6 mesh network, the Netgear Orbi AX6000.

Note: If you have a Netgear router, you can get a smart wizard by going to 192.168.1.250.
We’re going to tell you the fastest way to setup Netgear AC1900 with your main WIFI network:
WARNING: Do not unplug or turn off your device while the light is blinking.

Follow the below-given web-based setup guide to configure your Netgear AC1900 WIFI range extender:
Step-by-step guide for Netgear Orbi AX6000 setup Your experience with a smart home is raised by the WiFi 6 mesh network, the Netgear Orbi AX6000.
A Complete Guide to Fix Netgear POE Switch ProblemsThe networking feature known as POE, also called Power over Ethernet, is described by the IEEE 802.3af
Netgear Extender Access Point Setup: A Complete Guide New Extender Setup Netgear WiFi range extenders allow users to connect to their routers from anywhere in
Netgear Nighthawk AXE 11000 Router SetupDo you have a thing for Netgear devices? Is that a yes? When did you most recently bring a new
How to activate access control on a Netgear wifi extender?Access control is a security method that limits who or what can access resources in a
Troubleshooting Tips for Netgear Authentication Error When Netgear users are unable to connect to wireless because they have forgotten their Netgear extender default password, an
If you are experiencing issues with Mywifiext not loading, there are a few troubleshooting techniques that you can try to resolve the issue quickly. Mywifiext
Netgear Nighthawk XR1000 Router Setup New Extender Setup The Nighthawk XR1000 Pro gaming router was created with maximum gaming performance in mind. Furthermore, the Nighthawk
NETGEAR EX7500 SETUP | AC2200 NETGEAR EX7500 Setup: When it comes to wireless mesh extenders, nothing can beat the competency of the Nighthawk X4s AC2200.
How to fix Netgear extender firmware update failure issue? A frequent Netgear extender firmware update is required for your Netgear extender to function properly. However,
Have you been having issues with your extender’s performance or is it acting strangely? If this is the case, you must update to the most recent version of the firmware given by NETGEAR. After you perform the Netgear AC1900 firmware update operation on your booster you will get the latest features and security updates which helps you to improve the performance of your AC1900 and to fix bugs as well.
For Netgear AC1900 firmware update go through the steps given below:
By following these steps you will be able to update the latest version of firmware on your Netgear AC1900.In the following blog, we’ll go over how to perform a factory reset.
In case you are not able to remember your admin password or your username and you want to recover it then, you will have to go with the Netgear AC1900 firmware update process. When you conduct a factory reset on your extender, it deletes all personalized data, including your password, username, and SSID, and it prepares your extender for the fresh installation procedure. So Let’s begin with the reset procedure.
Here are the steps to reset Netgear AC1900:
In case you are facing any trouble regarding the setup, update or reset operation you can reach us by sailing our toll free number and also via live chat. Our technical experts will assist you in resolving any problems.
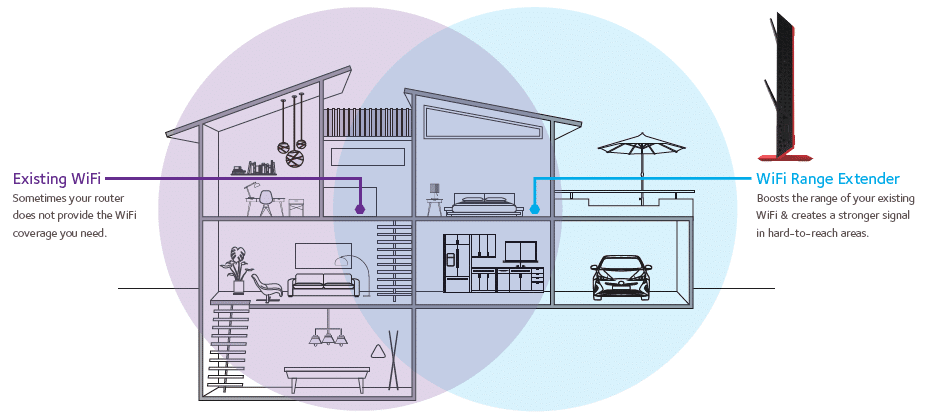
Here are the following things to check before installing your WIFI booster to your exisiting network:
Tip: Anybody can always control the extender setting page, once you connect your device to Netgear range extender and login to www.mywifiext.net in your application URL bar. Netgear genie Setup helps you to explore for the prevailing wireless network which is that the range of your Netgear range extender. When the searching is complete it’ll show the wireless connection list within the range.
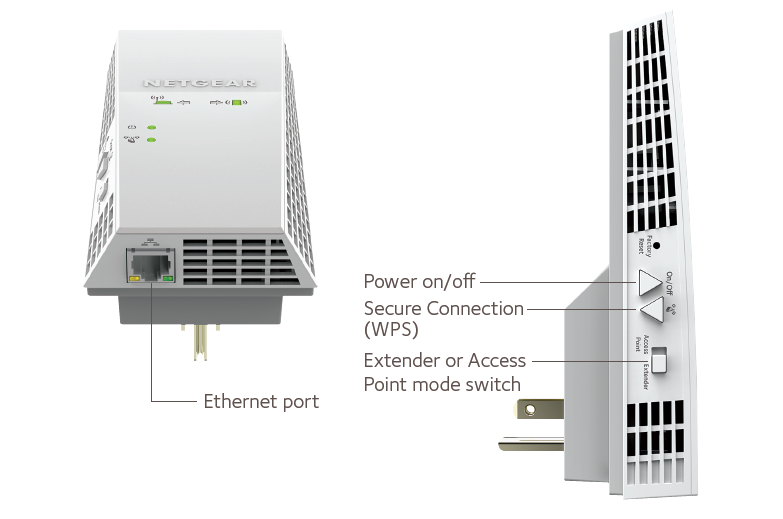
WIFI Range Extender Setup
Mywifiexthelp.net is an independent service provider of support. Brand names, products and services are only for referential purpose.
Mywifiexthelp.net hereby disclaims that brands names, trademarks, logos, company names used in the site are for representation purposes only.
Copyright 2023 – All Rights Reserved