
Netgear Extender Setup
Netgear Extender setup is the best approach to improve your present WiFi range and performance.
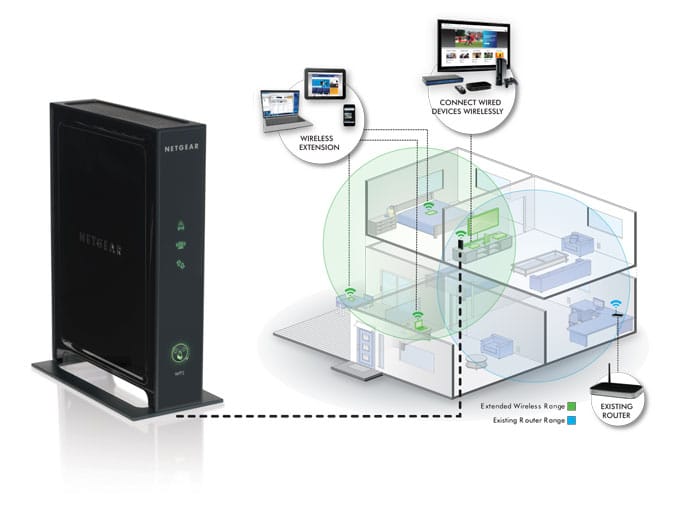
A WiFi range extender can help you to resolve this situation. Once you have completed the Netgear extender setup, it takes your router’s current WiFi signals and rebroadcasts them across your home, providing you with WiFi in every room.
Netgear Extender Setup: Manual Method
To perform Netgear Extender Setup follow the given steps below:
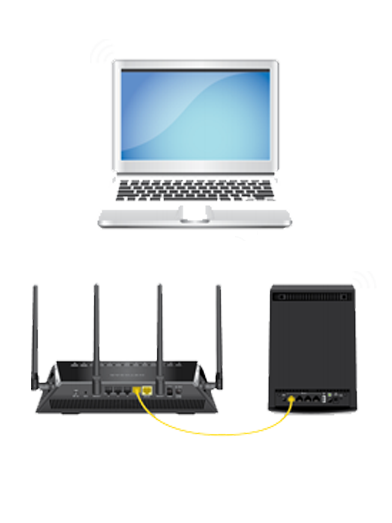
- Plug in your Netgear extender into a power socket.
- Place it near the existing router.
- Go to the network manager and get connected to the Netgear_ext SSID.
- Launch any internet browser and visit www.mywifiext.net.
- Create an account in mywifiext login web page.
- Tap on the network name that you want to extend.
- Tap on the finish button to complete the setup procedure.
- You can unplug your Netgear extender now and replug it at the place having dead zones.
In case you need any help you can contact us by dialing our toll free number or via live chat.
Our professional technicians will assist you to fix your problem.
Netgear Extender Setup WPS Procedure
In case you get stuck to perform Netgear Extender Setup by manual method then let’s go with a different procedure to configure your wifi booster i.e. the wireless protected setup (WPS) and it is considered as the most quick and easy way to install your wifi repeater within two minutes only. There is no need to type your password, username or SSID. You have to push a small button on your extender and router also.
Netgear Extender Setup Informations
To perform Netgear Extender Setup by WPS method follow the instructions given below:
- Power on your Netgear Extender.
- Position it near the router.
- Find the WPS push button on the side panel of your booster.
- Push the WPS on it.
- Push the same WPS button on the router too.
- Wait for the repeater to give three solid green lights.
- Once it gives three solid green lights it means the connection between your Netgear extender and router has been successfully established.
- Now unplug your extender and plug it in at the place having dead spots.
In this manner you can perform the wifi extender setup by WPS method.

How do i perform Netgear_Ext setup
The default extension for accessing your WiFi range extender is Netgear_Ext. After complete Netgear extender setup via mywifiext.net, devices such as PC, laptop, smartphone, and tablet and you can access the internet from the extender network. Turn on your extender. Then wait for the status LED to become stable green. Look for the Netgear_ext SSID on your wireless computer and connect to it (network name).
Why Netgear_Ext 5G is not showing on the network list?
There is many reasons behind Netgear_ext name is not showing in the wifi network list. I recognise some points why its happening with your extender so make sure these points are avoided from your side:
- Bad internet service
- Partial extender installation
- Network connection has been disabled
- Firmware that is outdated or corrupted
- Distance between the extender and router
Now that you know what might have caused the problem, let’s handle this problem to Netgear extender team to troubleshoot it.
How to perform Netgear Extender Setup using nighthawk app
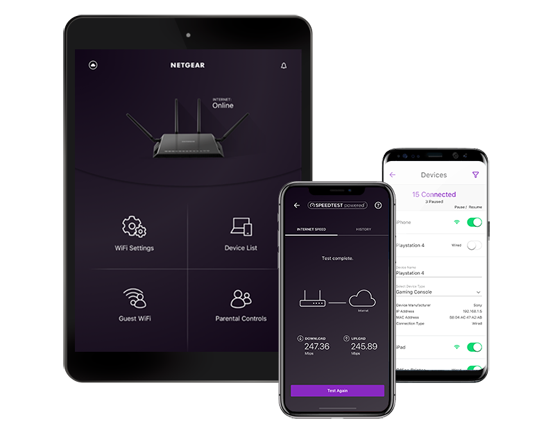
Nighthawk app is another method to install a Netgear wifi range extender. In this process you have no need to get on a smart device such as desktop, laptop, tablet e.t.c. Nighthawk app is available for both Android as well as for iOS devices. In order to perform new extender setup using nighthawk app you must have a smartphone and nighthawk app installed in it.
For Netgear extender setup using Nighthawk app follow the given steps given below:
- Grab any smartphone.
- Download the Nighthawk app in it.
- Connect your device to the Netgear_Ext.
- Visit the Nighthawk app.
- To finish the installation process follow the given on screen prompts.
- Once the setup is done place your extender at your desired location.
That’s how you can install your wifi booster using the nighthawk app.
Some common issues of Netgear extender setup
- Local access to mywifiext.net is unavailable.
- WiFi signal strength is weak or incorrect.
- Range of the WiFi router is insufficient or incorrect.
- How to set the Netgear range ext. default password.
- Setup a Netgear WiFi extender.
- The default SSID of the extension isn’t working.
- There are no blinking LEDs before or after the extension is installed.
- Issues with the configuration and settings of the extension port.
- I’m unable to access the extender’s settings page since I’m unable to log in.
- The administrator password for the extender has been lost or forgotten.
- I’m unable to access NETGEAR log in.
WIFI Range Extender Setup
RESOURCES
MYWIFIEXT RESOURCES
IMPORTANT RESOURCES
SUPPORT
- We provide mywifiext.net support all around the globe. Chat now for support
- Click Chat now for Support
- Mywifiextsetupus@gmail.com
Mywifiexthelp.net is an independent service provider of support. Brand names, products and services are only for referential purpose.
Mywifiexthelp.net hereby disclaims that brands names, trademarks, logos, company names used in the site are for representation purposes only.
Copyright 2023 – All Rights Reserved