netgear Extender setup

The Best Techniques for Increasing Netgear Extender Weak Signal

The Best Techniques for Increasing Netgear Extender Weak Signal

netgear Extender setup


A lightning-fast internet connection has become necessary for survival, much like water and electricity. Perhaps this is the reason why many customers put up Netgear extender setup in their houses. However, the WiFi network can occasionally become incredibly unreliable. That means that the network speed of your Netgear extender may change significantly from day to day. Or perhaps it will never ever achieve the claimed speed. The good news is that by using the advice in this post, we can help you improve the weak signal on your Netgear extender. Read on.

How to Improve a Weak Signal on a Netgear Extender

  1. Verify Your Connection

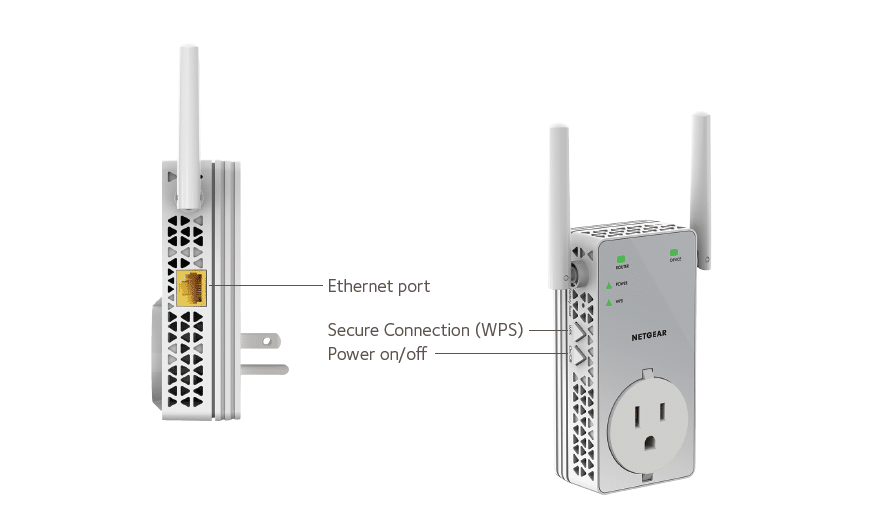
Check the medium of Netgear extender Setup and the host router before taking any further action to improve the weak signal. Are there wires? So that’s the reason you’re not getting the speed you want.

Be aware that while there is nothing wrong with connecting your devices to this source, it cannot be trusted 95 out of every 100 times. Therefore, what good is employing it if you desire constant access to seamless internet?

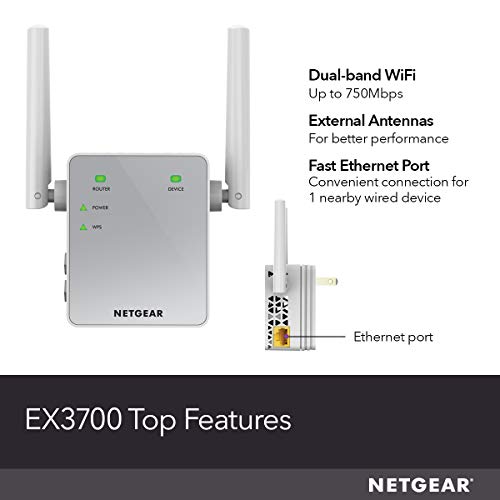
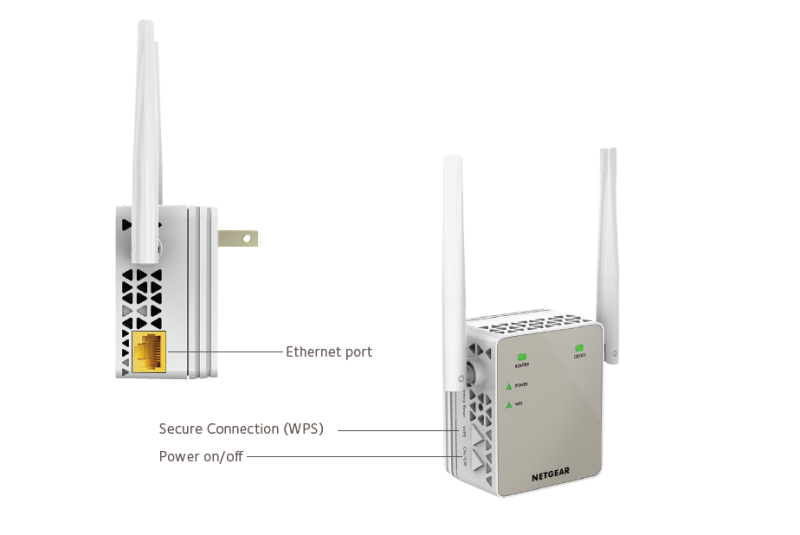
As a result, it is advised that you connect the devices using an Ethernet cable. Just make sure the connection is firmly fastened.

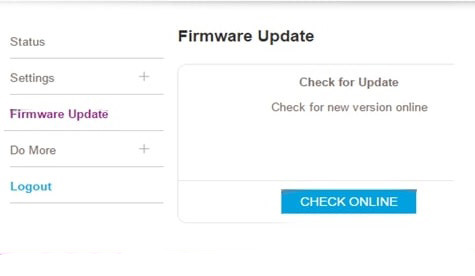
  1. Update the firmware on the extender

Every Linksys extender has software built in that checks its operation. The firmware is the name given to this software. Your device’s performance will start to decline if updates are not made in a timely manner.

In light of this, it is advised that you update your device’s firmware to the most recent version in order to improve the weak signal of your Netgear extender Setup. With the aid of the following recommendations, you can:

  • Connect your extender firmly to the router.
  • Obtain access to your device (laptop or computer).
  • Open Google Chrome if you typically use it.
  • Head over to the URL field.
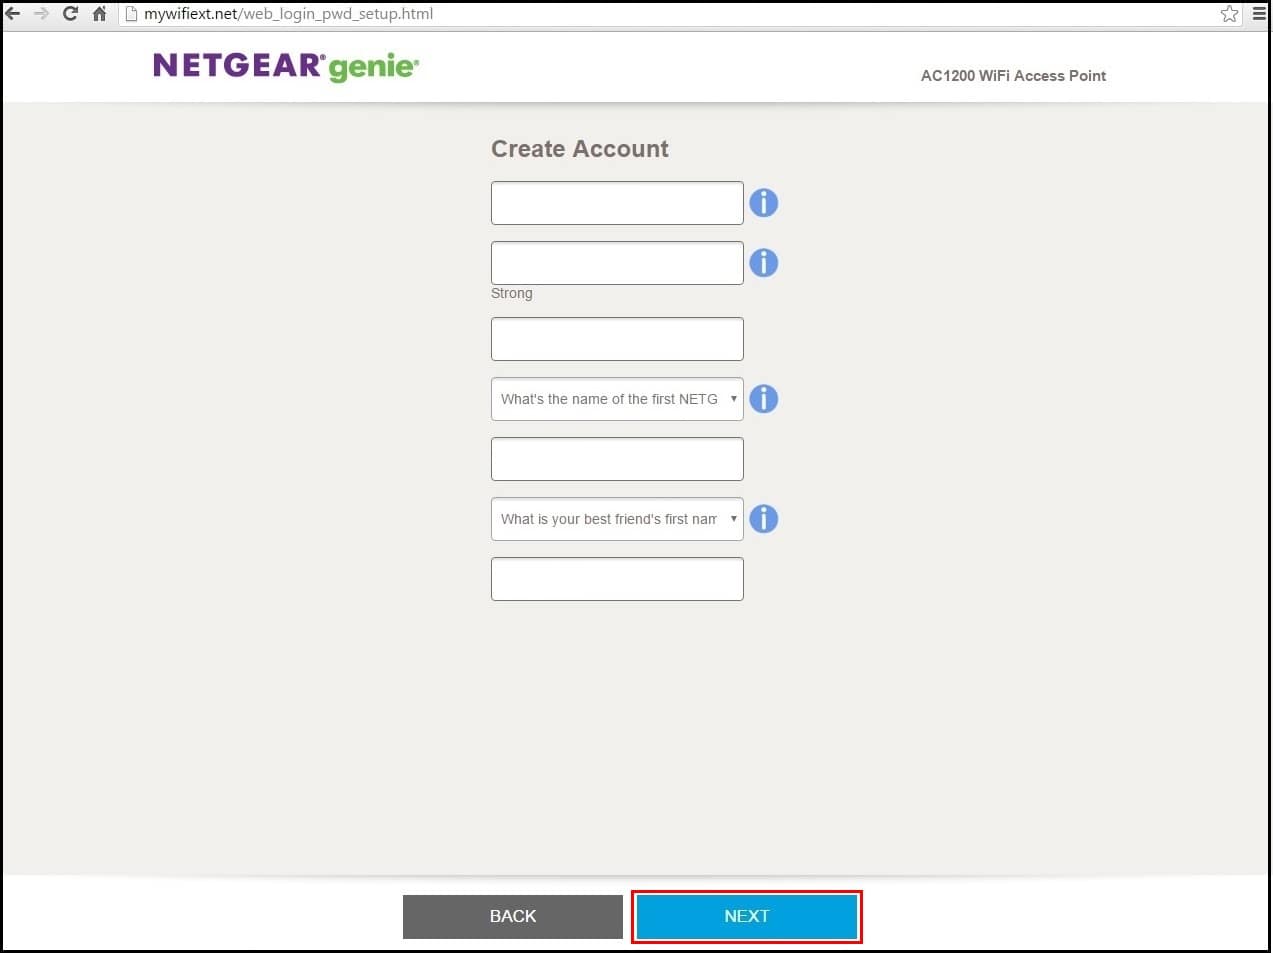
  • Put mywfiext.net, the default web address, in the URL field.
  • Press Enter.
  • Soon, you will be taken to the login window.
  • Under the Password field, enter the password.
  • Do the same with the default username of your extender.
  • Hit Log In.
  • Go to Administration and select the Firmware Update button.

Within some time, your Netgear range extender will get updated to its latest version. Got stuck at some point? Get in touch with our technical expertise. They will assist you figure out where you went wrong and what you can do about it. Plus, they will throw light on many other strategies by which you can increase Netgear extender weak signal.

  1. Relocate the Netgear Extender

Bluetooth speakers, cordless phones, refrigerators, microwave ovens, washing machines, baby monitors, treadmills, and televisions are broadcasting items that can disrupt or block the signals emitted by your Netgear extender.

As a result, you must discard these appliances. Do you have any idea how to do that? It’s really quite easy. All you have to do is move the extender from where it is now.

  1. Closer WiFi Device Pull

The signals from your Netgear extender will inevitably deteriorate if it is not kept within the router’s coverage area because it won’t be able to broadcast them effectively. So, think about closing the gap between the two gadgets.

But bear in mind that placing your extender and router too close together is not a good idea. Otherwise, their signals can interfere with each other.

  1. Unplug additional devices

Perhaps there are many more devices accessing the network of your extender than just one, two, or three. Consider the possibility that your Netgear extender’s WiFi signal will deteriorate if it is being shared among more devices than it can support.

We advise you to turn off every additional device connecting to the network of the Netgear extender in order to solve this issue.

Wrap up

It’s challenging to maintain a connection to the digital world when the Netgear extender’s signals deteriorate. We trust that after following the advice in this post, you were able to improve the weak signal on your Netgear extender without any problem.

Take our advice and get in touch with our technical experts if you still need assistance enhancing the WiFi on your extender. We assure you that they are accessible 24/7, whether you ping them during the day or at midnight.

NETGEAR EX3700 SETUP

Netgear AC750 Setup

Netgear AC750 Setup

Netgear AC750 is the series of wifi range extenders which comes with the simultaneous dual band 2.4Ghz and 5Ghz technology. It can deliver the max speed upto 750Mbps which leads to reduce the interference in your network.It comes with two wifi modes and two antennas for better wifi network coverage. After you perform Netgear AC750 Setup you will be able to use your extender in two different modes.You can use it to extend your existing network and you can also use it to create a new Access point as well. Let’s go with the setup process.

For Netgear AC750 Setup follow the instructions given below:

  1. Power on your Netgear AC750 EX3700 extender.
  2. Place it closer to the home router.
  3. Wait until the power LED on your AC750 turns solid green.
  4. Now you need to grab any mobile device.
  5. Connect your wifi enabled device to the existing network.
  6. Open a web browser and visit www.mywifiext.net.
  7. Go to the New Extender Setup.
  8. Follow the on screen prompts to finish the setup process.
  9. Once it is done,unplug the booster and plug it between the dead zone and your wifi router.
NETGEAR EX3700 SETUP

Table of Contents

That’s how you can setup your Netgear AC750 manually. But a manual method is not only one way to setup your booster, You can also configure it with the WPS Setup. In the next blog we will discuss the WPS method to configure your repeater.

Netgear AC750 setup

Netgear AC750 WPS Setup

Let’s get introduced with another way to setup your Netgear AC750 i.e the Wireless protected setup (WPS) which is considered as the quickest procedure to configure your repeater. Netgear AC750 WPS Setup will not take more than 2-4 minutes to be performed. Let’s see how this setup is supposed to be done.

Here are the steps to do Netgear AC750 WPS Setup:

  1. Power on your Netgear AC750.
  2. Position it near to the existing router.
  3. Wait until the power LED on your AC750 gives solid green light.
  4. Press the WPS button on the booster.
  5. Also press the WPS button on the main router after a minute.
  6. When your booster gives three solid green lights,which means that you have finished the setup process.
  7. Now it’s time to unplug your AC750 and place it at the location having dead spots.

That’s how you can install your Netgear EX3700 setup on login page of mywifiext.net within two minutes only without entering any personal information like passphrase,username and SSID.In the next blog we will talk about the procedure to update the firmware on your extender.

Netgear AC750 firmware update

Have you been facing problems with the performance of your extender or is it behaving badly? If yes then you need to update the latest version of the firmware which is provided by NETGEAR. After you perform the Netgear AC750 firmware operation on your booster you will get the latest features and security updates which helps you to improve the performance of your AC750 and to fix bugs as well.

For Netgear AC750 firmware update go through the steps given below:

  1. Firstly turn on your Netgear AC750 by plugging into a power socket.
  2. Place your repeater and existing router close to each other.
  3. Open any web browser and go to www.mywifiext.net.
  4. Type your username,passphrase and SSID to login.
  5. Hit on settings option and then on firmware upgrade.
  6. During the update process do not unplug your AC750.

By following these steps you will be able to update the latest version of firmware on your Netgear AC750. In the next blog we will talk about the factory reset operation.

Netgear extender firmware update

Netgear AC750 reset

In case you are not able to remember your admin password or your username and you want to recover it then, you will have to go with the Netgear AC750 firmware update process. After you perform a factory reset operation on your extender it will delete all the personalized data including your password,username and SSID also and it will make your extender ready for the new installation process. So Let’s go with the reset operation.

Netgear ac750 setup

Here are the steps to reset Netgear AC750:

  • Turn on your Netgear AC750.
  • Find the reset button on your extender.
  • It is available on the side of the AC750 under a small hole.
  • Grab a sharp pointed needle or a pin.
  • Press the reset button with the help of a pin for 10 seconds.
  • After 10 seconds take it out.
  • In this way you have performed the factory reset operation successfully.

In case you are facing any trouble regarding the setup,update or reset operation you can reach us by sailing our toll free number and also via live chat. Our technical team will help you to resolve your issues.

Netgear mywifiext setup

Netgear EX3700 Setup

Netgear EX3700 Setup AC750 WiFi Extender

Netgear Ex3700 or Ac750 wireless range extender is one of the best extenders comes with a dual bandwidth. The Netgear extender helps to increase the range and speed of the existing wireless network. With the dual band feature, Netgear Ex3700 can deliver up to 750 Mbps. It works with any wireless modem or router and gives ample wireless connectivity.

Netgear mywifiext setup

 Netgear EX3700 WiFi Extender Setup

Given the detail information to set up a brand New extender with your laptop or a desktop computer.

  1. Netgear EX3700 setup, you will have to plug the Netgear EX3700 Extender into the wall socket and extender should stay within the range of your router.
  2. You will need a Wi-Fi Enabled device to set up your Netgear EX3700 Extender.
  3. Open the web browser on your device and connect with www.mywifiext.net
  4. You will be able to see New Extender Setup Button, Which you need to click on.
  5. Now you will see two options Wi-Fi Extender Or Access point.
  6. This will be your call if you want to install your EX3700 as Extender or Access Point.
  7. After selecting the mode. Choose the wireless network which you want to extend. Then click Next
  8. Now it will ask to enter a security key. The security key will be your home wifi password or passphrase.
  9. After entering wifi password or passphrase. Click on Next
  10. Now it will ask to create a name of your extender. Or else you can use the name which is predefined. Then click on Next
  11. It will take 2 – 3 minutes to apply the setting on your extender. So do not unplug or turn off your extender.
  12. When the setup is completed your extender will have 3 solid green lights. Now connect any wireless device to check your extender is communicating to the wifi.
  13. After connecting the device you will be getting 4 solid green lights on your extender.

Now place your Netgear EX3700 to your desired location. If you are facing any difficulties to install your extender kindly visit the official site of mywifiext.net and chat with tech expert they will arrange call for you or send us an email – support@mywifiext.us

Netgear extender ex3700

Step By Step Method for Netgear Ex3700 Setup

Do you want a fast internet connection with an increased range? 

Say no more! 

Get ready to experience improved speed, and range of internet with the help of Netgear ex3700 extender. This extender will provide you with reduced interference in your internet connection along with a noticeable increase in the speed and range. 

To get started with the extender you need to follow these steps for the Netgear Ex3700 setup. 

Steps for setting up Netgear EX3700 

Here are the steps that you are required to follow for setting up your Netgear ex3700 with the help of a web browser: 

  1. First of all, plug in the extender to a stable supply of power in an adapter and then wait for the indication from the LED light. The LED light will become completely green when the extender is successfully connected to a power source. 
  2. Connect with the network of your router with the help of Wi-Fi. Make sure that the network is stable and fast. 
  3. Open up a web browser of your choice and then enter the web address www.mywifiext.net or Mywifiext.net in the URL bar and when the website loads up completely, click on the setup button. 
  4. Then you will be presented with the list of available Wi-Fi networks, select the one that you wish to extend from the list. Then click on the Next button. 
  5. Then you will get two input fields one for the name of the network and one for the password. Enter the details for the name and password respectively. After you’ve done doing this, click on the Next button. 
  6. Then just connect your extender with the wireless network device and again click on the continue button on the website. With this step, the configuration of the extender is completed and it is ready for extending the network. Then just click on the button that reads “next” to continue with the step of registering your extender. 
  7. Then just click on the finish button so that the registration can be completed. 

With this step, the Netgear Ex3700 setup is complete and you can start extending the network of your network at home or at the office. If you face any problems while following the above steps for setting up your extender then you can contact the customer service on mywifiext.net official site and get online chat with technical expert. They will arrange call for you and make your extender work with in 20 minutes. 

Here are the instruction for Netgear Ex3700 setup with the help of WPS: 

  1. First of all, power on your Netgear ex3700 extender by providing it a power supply for 
  2. Then you must place the extender as well as the router in the same room so that they can attain the maximum connectivity. 
  3. Once you have successfully made all the arrangements, turn on the extender. 
  4. You will see a green light on the extender’s LED once it has successfully turned on. 
  5. Then you need to press the WPS button which is available on your extender. 
  6. Then you have to notice the status of the LED light. If it turns white then the router and the extender are connected successfully. 

One thing that you need to take care of is that if the router that you own supports the band of 5GHZ then the extender will make an attempt to connect with the router once you press the WPS button. If it fails to get connected with the router at the first attempt then you may need to contact the customer service for getting the appropriate instructions for Netgear Ex3700 setup

Netgear Wn2500 setup

Netgear EX3920 Setup

Netgear EX3920 Setup | AC750 Extender

To Setup your Netgear EX3920 you need to unbox the extender first, you will find Two Netgear Units and the most important EX3920 Manuals. Which can be difficult to understand for non-tech savvy users. If you are one who is not well trained to perform such tasks you can use our chat or call support.

Netgear Wn2500 setup

Table of Contents

How do I set up my Netgear EX3920?

For the Netgear EX3920 Setup, you need to follow the steps below:

  • Place the EX3920 AC750 Extender near the Home Wi-Fi router.
  • Plug the extender into the electric outlet.
  • Now, wait for the power light to turn amber and then turn solid green on your Netgear EX3920.
  • If the power LED does not light, press the power on/off button.
  • After your extender is on, you need to connect your wireless device with the Netgear_ext network.
  • Visit www.mywifiext.net after you are connected to the Extender’s network.
  • Complete the on-screen instructions to install your Netgear EX3920.

As the Netgear EX3920 comes with two units you need to do the same steps given above for the second unit too. These are two different extenders for large homes with more area to cover if you still find any issues you may use our chat support now.

Complete Netgear EX3920 Setup using WPS

To install your EX3920 extender using WPS:

  • For the EX3920 Setup, plug the extender in close proximity of your home router.
  • Wait for the power light to turn steady/solid green.
  • Once you will get the power light on the extender then push the W.P.S button on the Netgear EX3920.
  • Now within 1-2 minutes push the W.P.S button on the router or modem.
  • Now there will be a green light that will start blinking on the modem and as well as on your Netgear AC750.
  • Once you’ll get all solid green lights on the extender which means your extender is successfully connected to the 2.4GHz home wifi network.
  • Repeat the steps to connect the extender to the 5 GHz band if your WiFi router supports it.
  • Unplug the Netgear EX3920 extender once all the steps mentioned are complete and move it between the dead spot and the router for optimal performance.
mywifiext setup

As discussed before also you can do the same process with your Netgear EX3920 second unit too for it to be up & running. That’s how you can complete the Netgear AC750 EX3920 Wifi Extender Setup. If you still think you need some help, feel free to reach our support using the chat option.

Netgear EX3920 Run Smart Setup Installation 

EX3920 Smart setup installation is an easy process, in which users can Re-install or Manage the extender from any of the devices connected to the same unit. you can make changes like Rename the Ac750 EX3920 SSID or the Wi-Fi password.

To run the Netgear EX3920 Smart setup:

  • Pick any of your wireless devices and connect them with Netgear EX3920 Network.
  • Once connected, the device LED on the AC750 Extender will go green.
  • Launch a Web browser like Chrome, Edge, Safari, or Firefox.
  • Enter mywifiext.net on the address bar of the browser.
  • Click the login button to enter your email address and password.
  • Click the Smart setup and the welcome page comes on the screen of your device.
  • You are logged into the Ex3920 dashboard from where you can re-install or manage your extender easily.
  • For more info, you may talk to our AC750 EX3920 expert team.


Following the directions above you can configure your wifi extender in quick mins only, the process discussed above is web browser smart setup. If you still have any issue with your Netgear EX3920 Setup. Dial our Toll -Free.

How to configure the Netgear EX3920 extender via web browser setup?

To configure your EX3920, you can also use your web browser like Chrome or Safari, Web browser setup process for Netgear Ac750 Ex3920 is only applied when you can’t follow the WPS setup process or in any case, your router or modem does not have the WPS button. You may follow the directions to install your EX3920 extender given below.

  • Make sure EX3920 is plugged and powered up.
  • For initial installation, the extender will remain closer to the router.
  • Now on your Smart device Go to Wireless manager.
  • Select the Netgear_ext SSID displayed on the Wi-Fi settings.
  • Connect your Smart device with the same network.
  • Visit the Netgear EX3920 setup page now to complete the setup process.
  • Once you are on the setup page, It might ask you to create an account that you easily set up in a few seconds.
  • Now the on-screen directions are very easy to work with.

till there are some issues with your EX3920 Wifi extender, you are recommended to get in touch with our experts. To reach our experts you email us.

Reset Netgear EX3920 Wi-Fi Extender

To reset your EX3920 wifi extender, you need to check first if your extender has a proper power supply and the Power LED on the Netgear EX3920 is solid green.

Steps to Reset Netgear EX3920:

  • You need to look on the left side of the Netgear EX3920 extender.
  • There you can see two buttons, one will be on/off another will be WPS.
  • Above the WPS button, between the small triangles.
  • You will see a small circle, that is the Reset hole for your EX3920.
  • Grab an object like a Pen or Paper clip.
  • Now put that into the Reset hole and hold it down for a few seconds.
  • Take the object out of the hole & wait for the Power light to turn green.


By following the steps we talked about above, you should be able to reset your Netgear EX3920 in one minute only. Note: Do not unplug the extender while you are trying to reset it. If that happens you extender can have hardware or software

Netgear ex6150 setup

Netgear EX6150 Setup

Netgear ex6150 setup

Complete guide for Netgear EX6150 setup

With the Netgear EX6150 setup, you may extend your existing WiFi range to every part of your home. The Netgear EX6150 AC1200 WiFi range extender extends the radius of your existing network and provides continuous WiFi speeds of up to 1200Mbps (Megabits per Second). It works with any normal WiFi network and is great for large houses, as well as hassle-free HD movie streaming and online gaming.

Netgear EX6150 Manual: When you purchase a new Netgear EX6150 AC1200 range extender, it comes with a manual. From beginning to end, the Netgear EX6150 WiFi extender handbook comprises of a sequence of Netgear AC1200 setup instructions. Simply follow the Netgear EX6150 setup instructions in the handbook to get your EX6150 extender up and running. But wait a minute! Understanding the Netgear EX6150 extension instructions can be challenging for a novice. Chat with our experts today to install Netgear EX6150 WiFi range extender without any issues.

Netgear EX6150 extender setup via WPS

If you want to setup your Netgear ex6150 range extender using the WPS method, please follow the instructions given below:

  • Tap the WPS button on your Netgear ex6150 extender for only 5 minutes till the WPS light flashes.
  • In about 2 minutes, tap on the WPS button on the host router or main Wi-Fi.
  • Whether your Wi-Fi router has the 5 GHz band, redo the Steps 1 and 2 to attach with Netgear ex6150 extender to the 5 GHz signal.
  • Take off Netgear ex6150 extender and place it anywhere you want which is almost from your Wi-Fi to the location with a bad router WiFi connection.
  • Turn on Netgear extender by plugging the power socket and stand by till you see the Power light turn green.
  • Look at Router Link light for getting a location where the Netgear ex6150 signal is stable.
  • Whether the Router Link light does not turn to amber or green, attach Netgear ex6150 extender to the nearest power socket to main Wi-Fi and redo the steps.
  • Now on PC or smartphone, look for and attach with the Netgear EX6150 extender network.
  • You can check Netgear extender by placing the laptop or smartphone to the location with a bad main Wi-Fi signal.
www.mywifiext.net

How do I connect my Netgear ex6150 extender to Wi-Fi?

This is the second way to attach your Netgear ex6150 wi-fi range extender to your main Wi-Fi router by using the internet browser, so follow the steps given below:

  • Firstly, you have to power on the Netgear EX6150 extender.
  • Move Netgear extender near to the main Wi-Fi box.
  • Next you will turn on Netgear ex6150 by attaching it to the power socket.
  • Stand by till the Power light turns green.
  • Whether the Power light does not turn on, tap on the Power button.
  • Attach the PC or smartphone to the ax6150 extender to the main Wi-Fi network.
  • Open up the internet browser from a laptop or smartphone and type in www.mywifiext.net.
  •  Netgear installation assistant will be shown.
  • Obey all the steps to attach the Netgear ex6150 extender to the main Wi-Fi network.
  • Place the ex6150 extender to any place that is about half between the main Wi-Fi and a place where there is a bad Wi-Fi network.
  • Whether there is no connection or a bad connection, place Netgear ex6150 extender closer to your router and reconnect till the Link Status light turns to white.
  • When you finally find the best location for Netgear ex6150, attach all the devices to the Netgear ex6150 extender.

How to factory reset my Netgear ex6150 extender?

Whether you have any problem or issue with your Netgear ex6150 extender and you want to factory reset it, just go with the steps given below and your Netgear ex6150 range is reset easily.

Netgear EX6150 reset

Whether you have any problem or issue with your Netgear ex6150 extender and you want to factory reset it, just go with the steps given below and your Netgear ex6150 range is reset easily.

  • Open up PC or any smartphone that is attached to the Netgear ex6150 network, now open any internet browser.
  • In the website bar of the web browser, put in www.mywifiext.net.
  • Type in the email address and password and tap on the LOGIN option.
  • Whether the internet browser shows the Menu option, tap on it.
  • Choose Settings which is under Other Settings.
  • Tap on the RESET option.
  • Now your Netgear ex6150 extender is set to factory default settings.

Netgear ex6150 Wi-Fi Extender | Firmware Update

These are steps to follow when you want to upgrade your Netgear EX6150 wi-fi range extender firmware, the process is very easy and simple.

  • Open up PC or smartphone that is attached to Netgear ex6150 extender, open any internet browser.
  • Type in this in the website bar of browser www.mywifiext.net.
  • Type your email address and password and tap on the LOGIN option.
  • Whether the browser shows the Menu option, tap on it.
  • Choose Settings and under its Firmware Update.
  • Tap on CHECK ONLINE option.
  • Whether the latest firmware is there, obey all the steps to download it to your Wi-Fi enabled device.
  • Tap on the BROWSE option.
  • Now, choose the latest firmware that is downloaded.
  • Tap on the UPLOAD option.
Netgear EX6150 firmware update

Netgear EX6150 configuration common issues

Here are some common issues that users may encounter while setting up Netgear wifi extender:

  • Netgear EX6150 is not working on a Mac or an iOS smartphone.
  • The WiFi extender is connected, but there is no internet connectivity.
  • The Netgear extender’s default web URL is not working.
  • The WiFi extender is disconnected from the network.
  • MAC address filtering errors.
  • The Netgear genie app does not start.
  • Mywifiext.net is currently unavailable.
  • Mywifiext.com is not operational.
  • I’m unable to connect to the Netgear EX6150 repeater.
  • The Netgear Extender is not functioning properly.
  • There are issues with WiFi connectivity.
  • The WiFi extender cannot connect to the internet.
  • Netgear extender’s red light issues.

Netgear ex6150 extender troubleshooting steps

The following instructions give the troubleshooting steps for your NETGEAR ex6150 Wi-Fi Range Extender if sometimes any type of issue persists in your Netgear ex6150 range extender.

  • Whether you don’t remember the username or password, tap on Username & Password Help option.
  • Whether the internet browser shows the error page, put in http:// in the website bar of the web browser by putting in http://www.mywifiext.net.
  • Whether you did setup the Netgear ex6150 extender but it can’t attach with the main WiFi network, look to see whether your Device Link light is off or could be red. 
  • Whether it is off try placing the PC or smartphone near to Netgear ex6150 extender.

If you don’t have WiFi network working, you will have  to get an Ethernet cable to attach  the PC to Netgear ex6150 extender.

NETGEAR EX6150 Setup – Mywifiext

  • Turn on the extender and wait for the power light to boot up.
  • Use any wifi device like a tablet, cellphone, laptop or kindle.
  • Go to the wireless setting option on your respective device.
  • Look for the Netgear_ext on the list of available networks.
  • Connect your device with Netgear_ext.
  • Now open any web browser on your wifi-enabled device and type www.mywifiext.net
  • Netgear Ex6150 New extender setup page will appear on your screen
  • Create a login account and follow the instructions to connect your Netgear AC1200 Setup.

How to enable Fastlane technology after Netgear EX6150 AC1200 setup?

FastLane Technology ensures that you get the greatest WiFi performance possible. Essentially, it provides a high-speed WiFi connection via a dedicated band that connects the WiFi router to the extender and a second band that connects the WiFi device to the extender.

The Netgear EX6150 FastLane is configured as follows:

Netgear fastlane setup
  • Connect your client device to a WiFi network.
  • Then, open a web browser like Microsoft Edge, Google Chrome, or Internet Explorer.
  • Navigate to the login page for the Netgear AC1200 EX6150 extender.
  • Enter your username and password when prompted.
  • Select the ‘FastLane’ option on the Netgear Genie page.
  • You will now be presented with two choices: ‘Device-to-extender only in 2.4 GHz and extender-to-router only in 5 GHz’ and ‘Device-to-extender only in 5 GHz and extender-to-router only in 2.4 GHz’.
  • Select an option and then press the Save button.

If you are stuck at any point while enabling FastLane Technology on your extender, please contact our specialists right away.

Netgear EX6150 hard reset process

If you have an issue or a problem with your Netgear ex6150 extender and wish to completely reset it, simply follow the procedures mentioned below to easily reset your Netgear ex6150 extender.


  • Launch any web browser on a PC or smartphone connected to the Netgear ex6150 network.
  • In the address box of your web browser, type www.mywifiext.net.
  • After entering your email address and passcode, click the LOGIN button.
  • If the Menu option displays in the internet browser, select it.
  • From the Other Settings menu, choose Settings.
  • Choose the RESET option.

The factory default settings for your Netgear ex6150 extender have now been restored.

Table of Contents