Tricks to increase the performance of a Netgear wifi extender

Tricks to increase the performance of a Netgear wifi extender

Tricks to increase the performance of a Netgear wifi extender 

Tricks to increase the performance of a Netgear wifi extender

In this blog, you will find detailed instructions on how to improve the Netgear extender’s performance. Are your wifi router signals being disrupted by items in your home? In essence, both the wifi range extender and router emit magnetism waves that can be detected and modified by your controlled devices to provide high-speed internet web access throughout your home. However, several customers have reported problems with their Netgear extenders in recent years. They simply perform a Netgear wifi extender factory reset to repair it. However, this is not the only option.

However, you can easily improve the Netgear extender performance. This is the main problem for any user who is unable to use mywifiext setup.So, here are some steps you can take to strengthen the property of your network.

Let us now move on to the other important factors that may help you improve the Netgear extender performance:

Place your Netgear wifi range extender at a new position

Have you tried to figure out why your local area network signals stop working at times? All of this happens because some network areas are unaffected by your router’s signals or are out of network range. Some dead patches remain even after activating the wifi range extender. Why?

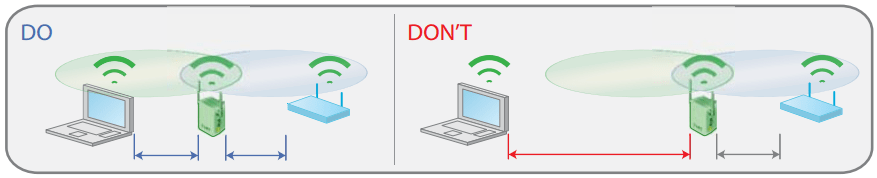
The presence of solid objects such as walls, doors, and electronic devices such as microwaves, TVs, radios, and so on near your range extender causes these dead spots. Additionally, the presence of these objects near the extender device prevents the boosted signals from reaching all areas of your home. Visit mywifiexthelp.net and look for a central location for the extender.

Update the firmware of your Netgear extender

Out-of-date firmware is one of the most common causes of your Netgear extender’s wifi connectivity issues. As a result, upgrade the firmware on your device by accessing the Netgear extender default IP address right now! You don’t know how to do that? That is not a problem! You can either study the user manual or contact our highly skilled technical staff for assistance.

Keep your Netgear wifi extender out of corners.

Isolating your range extender within the worst-case network signal scenario. It is logically impossible to connect to the Netgear extender setup process or place your device in a heavily trafficked area. The extender’s magnetic waves may cause the extender’s signals to be weak. For increased property to mywifiext, place your range extender in any open area.

Do not leave your networking tools lying around.

Your wifi-enabled devices emit signals in descending order. Furthermore, once your device is on the ground, the flag admission decreases because signals cannot connect through cement.

Maintain a safe distance between your Netgear wifi extender and electronic devices.

In fact, this is crucial. Simply place your Netgear router and extension as far away from your computers, laptops, and television as possible. These items can sometimes act as a barrier between the wireless connectivity of your router and extender. They also slow data transmission through the Internet interface.

We hope this blog helps you improve the Netgear extender performance. If not, the situation will remain the same. Simply contact us via chat or our toll-free number.

Netgear_Ext is not appear in the Network list

Why does Netgear_ext not appear in the Network List?

Netgear_Ext is not appear in the Network list
There could be a lot of causes for your ‘Netgear_ext not showing on network list’ problem. Here are a few examples:
  • Your internet connection is moving at the speed of a turtle.
  • You did not properly configure mywifiext.net.
  • Your Netgear range extender’s firmware has not been updated.
  • The distance between your extender and router is excessive.
  • You have not turned on the network connection.
Now that you know why your extender’s Netgear_ext SSID isn’t showing up in the network list, follow the steps outlined below to resolve the problem. If you want to skip the reading and receive an immediate solution to the problem you’re having with your device, contact our professionals.

How to fix: Netgear_Ext is not showing in the network list.

Close the gap between wifi devices (router and extender). To begin, measure the distance between your Netgear wifi range extender and your home router. Is it excessive? If the answer is affirmative, you now know where you went wrong. But don’t worry! reduce the distance between your wifi devices to resolve the Netgear_ext not appearing on the network list issue. Check that your wifi extender is within range of your router. Aside from that, make sure your gadgets have a solid connection.

Update the Netgear Firmware

As previously stated, an outdated firmware may also be the cause of your extender’s Netgear_ext SSID not appearing in the network list. So, without further ado, upgrade the firmware of your wifi booster right away! The following are the steps you should take to upgrade the firmware on your wifi device:
  • Turn on your PC.
  • Launch a web browser on it.
  • Go to www.mywifiext.net or 192.168.1.250.
  • Press the Enter key.
  • Fill in the default admin information.
  • Click the Login button.
  • Go to Settings after you’ve logged in.
  • Select firmware Update from the administration menu.
Once you’ve finished updating the firmware on your Netgear wifi extender, check to see if Netgear_ext is included in the network list. Still no joy?

Activate the Network Connection

Enabling the network connection may also assist you in resolving the problem you’re now having with your Netgear wifi range extender. To enable the network connection, perform the following steps:
  • Navigate to the Network adapter settings option.
  • Right-click on the SSID (network name) you want to use and select Properties.
  • After that, select Enable.
You’ll be able to eliminate at least one reason why your extender’s network name isn’t displaying on the list in this method.

Setup Your extender accurately

If nothing has worked so far, it’s most likely because you made a mistake during Netgear extender setup procedure using mywifiext.net. Thus, properly install your WiFi equipment while keeping the following considerations in mind:
  • All cable connections must be finger tight.
  • Make sure you’ve updated your web browser before logging in to your Netgear extender.
  • Avoid inputting the default login credentials incorrectly. Contact us if you are unsure of your device’s default username and password!
Let’s hope the troubleshooting tips in this post helped you resolve the ‘Netgear_ext not showing on network list’ issue. If you’re stuck with the same problem, our professionals are here to help you 24 hours a day, 7 days a week.
How to block devices from Netgear wifi extender network?

How to block devices from Netgear wifi extender?

How to block devices from Netgear wifi extender?

How to block devices from Netgear wifi extender network?

Not every device connected to your Netgear WiFi is willing to use your bandwidth. If you want to prevent your ungrateful housemates, leeching neighbor, or simply an unidentified device from utilizing your WiFi, you can apply a MAC address filter. This article will teach you how to block devices from your Netgear wifi extender

What is MAC Filtering?

Before we walk you through how to restrict devices from WiFi, let’s first define MAC filtering and how it works.

  • The Media Access Control, or MAC Filter, is used to produce a list of devices that are authorized or forbidden. To begin, you must know the MAC address of the devices you want to allow or prohibit.
  • A MAC address is a 12-character address assigned at random to a device. Regardless of where it is, the device remains the same. The MAC address of a connected device can be retrieved through the web user interface of the Netgear extender, i.e. mywifiext.net
  • While changing the WiFi password is an excellent technique to limit access to an unknown device, it is both cumbersome and ineffective.There’s also no guarantee that no one will guess the new password and gain access to your WiFi network.
  • You must also re-enter the new password for all previously linked devices. Alternatively, blocking a device is more effective and places it on the blacklist for a ‘lifetime’ restriction.

How Do I Block a Device From Netgear Extender’s WiFi Network?

That’s all there is to know about MAC filtering. Now, let’s look at how to prevent someone from using your WiFi.

Operation 1 – Ensure that the Extender is turned on.

First and foremost, ensure that your Netgear WiFi range extender is turned on. You can check the status of the Power LED to ensure that the extender is correctly turned on and receiving steady power supply.

If your Netgear extender is turned off, plug the power adapter into a wall socket and turn it on. However, keep in mind to inspect the wall socket; it should be in good condition.

Operation 2 – Turn on your computer or laptop.

The next step in blocking devices from your Netgear extender’s WiFi network is to turn on a PC or laptop. Then, go to the WiFi manager and connect it to a dependable and fast WiFi network.

Operation 3 – Access Your Netgear Extender

  • Now, launch your preferred web browser and the browser should be upgraded to the most recent version.
  • Enter the default web address of your Netgear range extender i.e mywifiext.net in the address bar and press the Enter key. 
  • Wait for the login page to fully load.
  • When finished, enter the admin user ID and password when prompted and click Log In.

Operation 4 – Disable WiFi on Devices

Do the following as soon as you reach the Netgear genie setup wizard:

  • Navigate to the Settings menu.
  • Select the option Connected Devices.
  • Then, tick the box labeled Enable Access Control.
  • Select the device to which you want to deny access and tick the Deny check box.
  • Once finished, click the Save button to apply the changes.

In this way, you can block devices from Netgear wifi extenders. It is recommended that only known devices join your wireless network. Don’t hesitate to contact our knowledgeable professionals if you run into any problems.

Why my I phone is not connecting to Netgear extender network?

Why my I phone is not connecting to Netgear extender network?

After completing the Netgear WiFi range extender setup process, consumers may connect any of their client devices to its network and enjoy super fast internet connectivity. But what if your iPhone isn’t connecting to the network of your Netgear extender? This will not only disrupt your internet experience, but will also halt many of your vital jobs that require internet connection.

If you are desperately looking for a solution to an issue, you have come to the perfect place. We will annotate numerous tips on how to resolve the ‘iPhone not connecting to Netgear extender issue’ in this section. So, all you have to do is try all of the techniques listed below and let your iPhone boast about having lag-free internet connectivity.

Why my i phone is not connecting to Netgear extender's network.

Steps to Resolve the iPhone Not Connecting to Netgear extender problem

Examine the connection between your iPhone and the Extender.

First and foremost, you should check to see if the connection between both of your devices is adequate. Perhaps your iPhone is accidentally linked to the wrong network, causing the ‘iPhone not connecting to Netgear extender’ error. To get rid of it, check the iPhone wifi connections and make sure everything is in order.

Restart Your Devices

Perhaps a technical issue is preventing you from accessing the internet on your iPhone. In this case, restart your iPhone and Netgear extender by turning them off for a few seconds. After a while, restart both devices and test internet connectivity on your iPhone to check if it works.

Check Your Data Pack

Are you certain you still have enough data for internet access? If not, check with your Internet Service Provider to see if your internet data is about to expire or if you have enough GBs to access lag-free internet.

Deactivate Security Apps

When connecting your iPhone to your Netgear extender’s WiFi network, the availability of various apps on your iPhone may also cause conflict. Antivirus, firewall, VPN, and ad-blocking programs, to mention a few, can be a hassle. To prevent the problem, consider temporarily uninstalling such apps and seeing if you can connect your iPhone to the network of your Netgear range extender.

Password Verification

After completing the Netgear extender setup, users frequently assign a strong password to their extender. It assists them in protecting their wifi from unauthorized parties and potential dangers. If you have also changed the admin details on your Netgear extender, we must first congratulate you for adding an extra layer of security to your device.

Now comes the question of whether you used the same password while attempting to connect your iPhone to the extender’s network. Are you unsure? Now, confirm the same by going to your iPhone’s wifi settings. If the password you provided in your iPhone’s wifi settings does not match the one you used for your extender, you know where the problem is and how to fix it.

Conclusion

This article will explain how to resolve the ‘iPhone not connecting to Netgear extender’ problem. If you’re still having trouble getting internet access on your iPhone, consider contacting our team of technical professionals for assistance. With remote access to your devices, one of our professionals will investigate the source of the problem and attempt to resolve it so that you may have a trouble-free internet experience on your iPhone.

For more information:

wireless mesh network

How to create a wireless mesh network at home?

How to create a wireless mesh network at home?

Do you have problems with your internet connection? The best way to solve the problem is to create a wireless mesh network with your current router. If you don’t know how to set up a wireless mesh network using an existing router, this guide may be of great assistance. So, before we get started, let’s first get you acquainted with Netgear Mesh WiFi Systems.

wireless mesh network

What are Netgear Mesh WiFi Systems?

Mesh system

Netgear Mesh WiFi Systems are the one-stop solution for enjoying lightning-fast internet across your home. Even after setting the router and performing the Netgear range extender setup, users may experience internet problems in certain regions of their homes. If you have dead zones in your house, creating a wireless mesh network with your existing router can work miracles.

The best mesh wifi will allow you to transform your home’s dead zones into entertaining zones. Mesh systems, which use advanced technology, are essentially offered to improve your Wi-Fi connectivity and elevate your internet-using experience to the next level. To reap all of the benefits, though, you must properly configure your Mesh network wifi at home.

Install WiFi mesh with an Existing Router

Please keep in mind that the instructions outlined below are for generic models. However, the processes may differ depending on whatever Mesh WiFi system you use.

Start by connecting the mesh system

Begin by putting your system’s power cord into a functional power socket to configure your Netgear Mesh WiFi with the existing router. After that, use an Ethernet cable to connect the Mesh system or nodes to your existing router.

Quick Tip: Make sure your Mesh WiFi system’s nodes (particularly the primary node) are in the correct location. Otherwise, you may encounter difficulties when configuring your Mesh network WiFi with your existing router. As a reminder, the primary node of your Mesh system should be located near your existing home WiFi router.

Install the Netgear App

When you have finished connecting your devices, go to the App Store that is compatible with your smartphone’s operating system and download the Netgear app.

Create a Netgear account and log in to your router to continue. After that, the software will walk you through the process of configuring your Mesh system.

Set Up Your wireless Mesh network

The program will now search for your Mesh system’s parent node. You will be notified as soon as the app detects the node. Take note that the node of your WiFi router will be assigned an IP address automatically.

The next step is to give your network a name and a password. Ideally, the same credentials should be assigned to both WiFi bands. Some systems, however, require a distinct password for the 2.4 and 5GHz bands. This is how you configure the nodes in your Mesh system.

Begin Changing Settings

Once you’ve finished configuring the Mesh network wifi with your existing router, you can begin modifying the Mesh’s settings to suit your needs. However, in order to get the most out of your WiFi system, keep the following factors in mind:

  • Never put your Mesh WiFi system’s nodes on the floor. Place them on a tabletop or higher surface instead.
  • Make certain that the Mesh system nodes are close to a working power socket. This eliminates the need for access to an extended cable.
  • Maintain a minimum distance of 30 feet between your nodes.
  • Place the nodes outside of a cupboard or under a table.

Finishing up

That was all about creating a wireless network with an existing router. We expect that the guidelines in this blog will assist you in configuring your Mesh without difficulty. Please keep in mind that if you encounter any problems while carrying out the process, you can contact our technical experts for rapid assistance. 

For more information:

mywifiext.net setup

Netgear extender Default ip address

netgear Extender setup

The Best Techniques for Increasing Netgear Extender Weak Signal

The Best Techniques for Increasing Netgear Extender Weak Signal

netgear Extender setup


A lightning-fast internet connection has become necessary for survival, much like water and electricity. Perhaps this is the reason why many customers put up Netgear extender setup in their houses. However, the WiFi network can occasionally become incredibly unreliable. That means that the network speed of your Netgear extender may change significantly from day to day. Or perhaps it will never ever achieve the claimed speed. The good news is that by using the advice in this post, we can help you improve the weak signal on your Netgear extender. Read on.

How to Improve a Weak Signal on a Netgear Extender

  1. Verify Your Connection

Check the medium of Netgear extender Setup and the host router before taking any further action to improve the weak signal. Are there wires? So that’s the reason you’re not getting the speed you want.

Be aware that while there is nothing wrong with connecting your devices to this source, it cannot be trusted 95 out of every 100 times. Therefore, what good is employing it if you desire constant access to seamless internet?

As a result, it is advised that you connect the devices using an Ethernet cable. Just make sure the connection is firmly fastened.

  1. Update the firmware on the extender

Every Linksys extender has software built in that checks its operation. The firmware is the name given to this software. Your device’s performance will start to decline if updates are not made in a timely manner.

In light of this, it is advised that you update your device’s firmware to the most recent version in order to improve the weak signal of your Netgear extender Setup. With the aid of the following recommendations, you can:

  • Connect your extender firmly to the router.
  • Obtain access to your device (laptop or computer).
  • Open Google Chrome if you typically use it.
  • Head over to the URL field.
  • Put mywfiext.net, the default web address, in the URL field.
  • Press Enter.
  • Soon, you will be taken to the login window.
  • Under the Password field, enter the password.
  • Do the same with the default username of your extender.
  • Hit Log In.
  • Go to Administration and select the Firmware Update button.

Within some time, your Netgear range extender will get updated to its latest version. Got stuck at some point? Get in touch with our technical expertise. They will assist you figure out where you went wrong and what you can do about it. Plus, they will throw light on many other strategies by which you can increase Netgear extender weak signal.

  1. Relocate the Netgear Extender

Bluetooth speakers, cordless phones, refrigerators, microwave ovens, washing machines, baby monitors, treadmills, and televisions are broadcasting items that can disrupt or block the signals emitted by your Netgear extender.

As a result, you must discard these appliances. Do you have any idea how to do that? It’s really quite easy. All you have to do is move the extender from where it is now.

  1. Closer WiFi Device Pull

The signals from your Netgear extender will inevitably deteriorate if it is not kept within the router’s coverage area because it won’t be able to broadcast them effectively. So, think about closing the gap between the two gadgets.

But bear in mind that placing your extender and router too close together is not a good idea. Otherwise, their signals can interfere with each other.

  1. Unplug additional devices

Perhaps there are many more devices accessing the network of your extender than just one, two, or three. Consider the possibility that your Netgear extender’s WiFi signal will deteriorate if it is being shared among more devices than it can support.

We advise you to turn off every additional device connecting to the network of the Netgear extender in order to solve this issue.

Wrap up

It’s challenging to maintain a connection to the digital world when the Netgear extender’s signals deteriorate. We trust that after following the advice in this post, you were able to improve the weak signal on your Netgear extender without any problem.

Take our advice and get in touch with our technical experts if you still need assistance enhancing the WiFi on your extender. We assure you that they are accessible 24/7, whether you ping them during the day or at midnight.