• Genie Setup
  • Mywifiext local
  • Netgear Extender Setup
  • Mywifiext Setup
  • Tips

HomeArlo login

Posts tagged: Arlo login

arlo login

Arlo Login

January 31, 2022
Netgear genieorbilogin

ARLO.NETGEAR.COM

ARLO.NETGEAR.COM is the official site of the arlo cameras to login and access its functionality. Arlo Security Cameras are high-quality camera modules that provide excellent surveillance. These cameras include cutting-edge technology and best-in-class components, allowing them to record videos in High-Definition (HD) quality. Arlo Security Cameras also have 2-way audio, live video streaming, cloud recording with alarms, and a slew of other impressive capabilities. With Arlo Cameras installed in your home or office, you may ensure full vigilance from all angles above and around the premises. Because of the high-quality components included into the cameras, these cameras perform just as well at night as they do in full sunshine.

Things to keep handy while performing arlo camera setup using ARLO.NETGEAR.COM

  • Ethernet cable to connect your arlo base station to the existing router.
  • Grab a phone or tablet.
  • Working internet connection to download arlo app.
  • Existing wifi username and passphrase.
  • Supported browser to access arlo.netgear.com
Arlo Base Station is the unit that connects your home network to Arlo security cameras; without it, your Arlo cameras will not work. So, in order to complete a successful Arlo Pro2 setup, be sure to install Arlo Base Station using ARLO.NETGEAR.COM.
Arlo Setup
arlo login

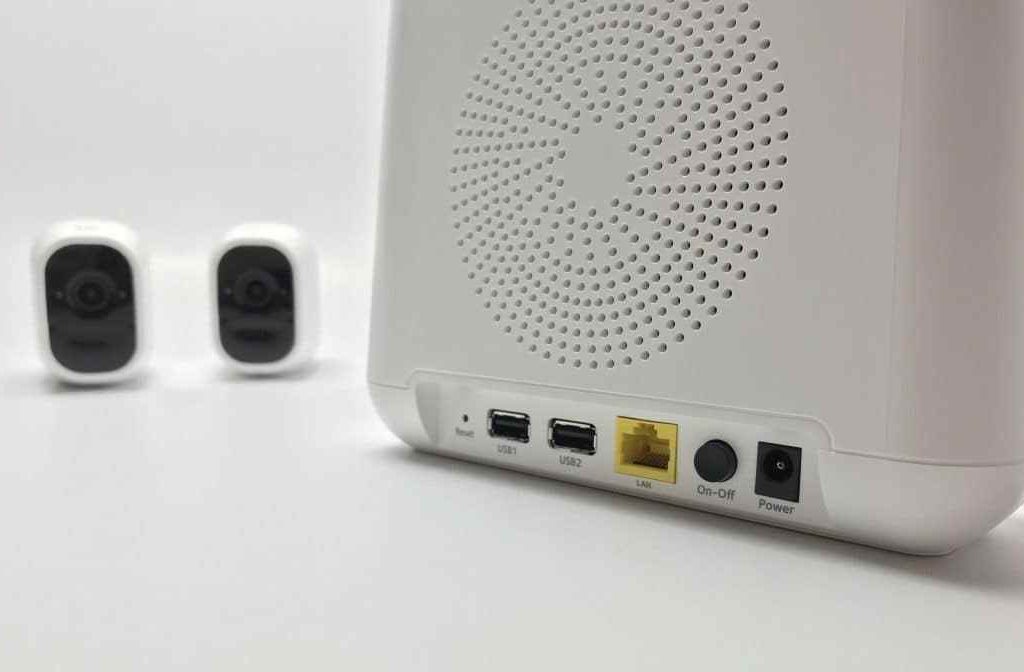
Here's the steps to install Arlo Base Station:

arlo setup instruction
  1. Turn on your Arlo base station.
  2. Grab any ethernet cable.
  3. Connect your arlo base station to the existing network using ethernet cable.
  4. Wait for a minute until the both LEDs on the arlo base station turn solid green.
  5. Now the setup process has been successfully done.
In this way you can set up your Arlo Base Station in a very simple way.In case you are not able to setup your security cameras by arlo.netgear.com then you can reach us by dialing our toll free number and also by live chat.Our technical team will assist you to troubleshoot or fix any issues that you might come up with during the arlo security camera setup.
For more information:
  • www.mywifiext.net setup guide
  • extender.linksys.com RE6300 setup
  • How do I Setup Arlo Cameras with my base station?

    To setup Arlo Security cameras with base station follow the given instructions below:

    • Firstly press the latch and pull it gently to open the battery compartment.
    • Insert the battery properly in the battery compartment.
    • Place the camera closer to the base station.
    • Press the sync button for 3-5 seconds available on the side of the base station.
    • Wait for some time until the sync LED turns green.
    • Now you need to press the sync button on the top of the camera.
    • Wait for the camera LED on the base station to turn solid green.
    • If the camera LED gives solid green light which means that the sync process is done.a
    By following the above procedure you will be able to setup and sync your arlo camera with the base station in very simple steps.If you still have any issue about the setup and sync process then not to worry contact our professionals to fix your issue.
    Arlo login

    How do I register my Arlo login account?

    After you successfully setup your Arlo base station and Arlo camera you will have to register to Arlo login account.Make sure that your Arlo system is linked with Arlogin my account. It gives you access to the video recording from any internet-connected smartphone or computer. You can also use the Arlo app on your smartphone or tablet to have a fantastic viewing experience.

    To register my Arlo login account follow these steps:

    • Get on any smart device like a smartphone or a desktop.
    • Go to Arlo.netgear.com.
    • Choose the arlo camera that you have installed.
    • Follow the on screen instructions to make arlo login account
    • Put your username and passphrase to sin in.
    • Now hit on the arlo login option.

    In this way you can register your Arlo login account.In case you need any help about the registration process then you can contact us anytime by dialing our toll free number and also by live chat.


    Arlo Login Setup Instructions

    Arlo setup instructions are applied to both Arlo base stations and Arlo Pro base stations when using Arlo Wireless cameras. When Arlo Wireless cameras are synced with an Arlo Pro base station, the Arlo Wire-Free cameras have access to the Arlo Pro base station's functions, including the siren and USB local backup storage option.

    Here are some Arlo setup instructions:

    • Firstly,install the Arlo application.
    • Power on your arlo camera.
    • Connect your arlo camera to your existing network.
    • Position your arlo camera properly.
    • Adjust the angle of your Arlo camera’s view.
    • Motion detection on your Arlo cameras should be tested.
    • Your Arlo camera should be armed.
    By following these simple steps you can configure your Arlo camera properly.In case you are not able to configure your camera then you can contact our professional technicians by dialing our toll free number and also by live chat.we are always there to help you 24*7.

    arlo.netgear.com
    Read More

    Our Services

    • Genie Setup
    • Netgear AC1200 Setup
    • Netgear AC3000 Setup
    • Netgear EX2700 Wifi Range Extender
    • Netgear Ex2800 Setup
    • Netgear Ex3110 Setup
    • Netgear EX3700 Setup
    • Netgear EX6100 Setup
    • NETGEAR EX6110 SETUP
    • Netgear EX6120 Setup Guide
    • Netgear EX6200 AC1200 Wi-Fi Range Extender
    • Netgear Extender Login
    • Netgear Extender Setup
    • Netgear N300 Setup
    • Netgear New Extender Setup
    • NETGEAR Nighthawk EX7000 WiFi Range Extender
    • Netgear Nighthawk Range Extender Setup
    • Netgear Nighthawk X4 AC2200 WiFi Range Extender EX7300 Setup
    • Netgear Powerline
    • Netgear Wn2500 Setup
    • Netgear WN2500RP (N600) – Universal WiFi Range Extender
    • Netgear WN3500RP setup
    • New Extender Setup
    • Nighthawk X6S Tri-Band WiFi Mesh Extender (EX8000)
    • Troubleshooting

    WIFI Range Extender Setup

    NEW EXTENDER SETUP
    SUPPORT: LIVE

    RESOURCES

    • Netgear AC1900 Extender Setup
    • Netgear AC750 Setup
    • Netgear EAX20 setup
    • Netgear EX3700 Extender Setup
    • Netgear EX3700 Setup
    • Netgear EX3800 Setup
    • Netgear EX3920 Setup
    • Netgear AC1900 Extender Setup
    • Netgear AC750 Setup
    • Netgear EAX20 setup
    • Netgear EX3700 Extender Setup
    • Netgear EX3700 Setup
    • Netgear EX3800 Setup
    • Netgear EX3920 Setup

    MYWIFIEXT RESOURCES

    • Netgear EX5000 Setup
    • Netgear EX6110 Extender Setup
    • Netgear EX6150 Setup
    • Netgear EX6250 Setup
    • Netgear EX6920 Setup
    • Netgear EX7500 Setup
    • Netgear EX7700 Setup
    • Netgear EX5000 Setup
    • Netgear EX6110 Extender Setup
    • Netgear EX6150 Setup
    • Netgear EX6250 Setup
    • Netgear EX6920 Setup
    • Netgear EX7500 Setup
    • Netgear EX7700 Setup

    IMPORTANT RESOURCES

    • Netgear Nighthawk Setup
    • Netgear Nighthawk XR1000 Router
    • Netgear WN2500RP Setup
    • Netgear WN3500RP Setup
    • Netgear Nighthawk Setup
    • Netgear Nighthawk XR1000 Router
    • Netgear WN2500RP Setup
    • Netgear WN3500RP Setup

    SUPPORT

    • We provide mywifiext.net support all around the globe. Chat now for support
    • Click Chat now for Support
    • Mywifiextsetupus@gmail.com

    Mywifiexthelp.net is an independent service provider of support. Brand names, products and services are only for referential purpose.
    Mywifiexthelp.net hereby disclaims that brands names, trademarks, logos, company names used in the site are for representation purposes only.

    Copyright 2023 – All Rights Reserved

    Shopping Basket

    Welcome to

    New Extender Setup