
How to create a wireless mesh network at home?
Do you have problems with your internet connection? The best way to solve the problem is to create a wireless mesh network with your current router. If you don’t know how to set up a wireless mesh network using an existing router, this guide may be of great assistance. So, before we get started, let’s first get you acquainted with Netgear Mesh WiFi Systems.
What are Netgear Mesh WiFi Systems?
Netgear Mesh WiFi Systems are the one-stop solution for enjoying lightning-fast internet across your home. Even after setting the router and performing the Netgear range extender setup, users may experience internet problems in certain regions of their homes. If you have dead zones in your house, creating a wireless mesh network with your existing router can work miracles.
The best mesh wifi will allow you to transform your home’s dead zones into entertaining zones. Mesh systems, which use advanced technology, are essentially offered to improve your Wi-Fi connectivity and elevate your internet-using experience to the next level. To reap all of the benefits, though, you must properly configure your Mesh network wifi at home.
Install WiFi mesh with an Existing Router
Please keep in mind that the instructions outlined below are for generic models. However, the processes may differ depending on whatever Mesh WiFi system you use.
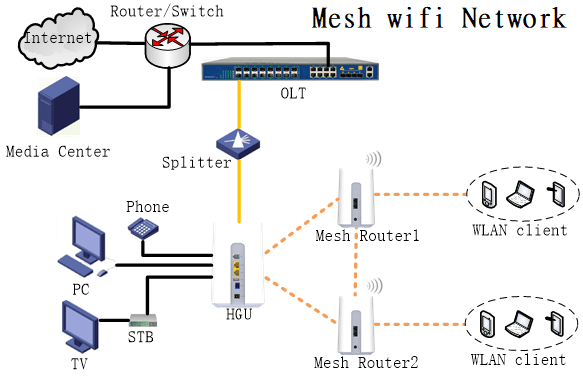
Start by connecting the mesh system
Begin by putting your system’s power cord into a functional power socket to configure your Netgear Mesh WiFi with the existing router. After that, use an Ethernet cable to connect the Mesh system or nodes to your existing router.
Quick Tip: Make sure your Mesh WiFi system’s nodes (particularly the primary node) are in the correct location. Otherwise, you may encounter difficulties when configuring your Mesh network WiFi with your existing router. As a reminder, the primary node of your Mesh system should be located near your existing home WiFi router.
Install the Netgear App
When you have finished connecting your devices, go to the App Store that is compatible with your smartphone’s operating system and download the Netgear app.
Create a Netgear account and log in to your router to continue. After that, the software will walk you through the process of configuring your Mesh system.
Set Up Your wireless Mesh network
The program will now search for your Mesh system’s parent node. You will be notified as soon as the app detects the node. Take note that the node of your WiFi router will be assigned an IP address automatically.
The next step is to give your network a name and a password. Ideally, the same credentials should be assigned to both WiFi bands. Some systems, however, require a distinct password for the 2.4 and 5GHz bands. This is how you configure the nodes in your Mesh system.
Begin Changing Settings
Once you’ve finished configuring the Mesh network wifi with your existing router, you can begin modifying the Mesh’s settings to suit your needs. However, in order to get the most out of your WiFi system, keep the following factors in mind:
- Never put your Mesh WiFi system’s nodes on the floor. Place them on a tabletop or higher surface instead.
- Make certain that the Mesh system nodes are close to a working power socket. This eliminates the need for access to an extended cable.
- Maintain a minimum distance of 30 feet between your nodes.
- Place the nodes outside of a cupboard or under a table.
Finishing up
That was all about creating a wireless network with an existing router. We expect that the guidelines in this blog will assist you in configuring your Mesh without difficulty. Please keep in mind that if you encounter any problems while carrying out the process, you can contact our technical experts for rapid assistance.
For more information: