
WWW.MYWIFIEXT.COM

The default login page for your Netgear WiFi range extender can be found by visiting mywifiext.com. Mywifiext is an acronym for three words: My, WiFi, and EXT. In this case, EXT stands for “Extender.” Using this web address, you can set up your extender and change its settings as needed. The most significant thing to consider is the requirements for a simple Netgear WiFi extender setup.
The following are the requirements for Netgear range extender setup:
- Locate your Netgear range extender in the same room as your router.
- Provide a proper power supply to your extender.
- The other thing is to have a functional WiFi network.
- You must grab a smart device having a web browser in it.
- It is necessary to have more than one web browser installed on your computer or laptop. It is possible that you will be unable to log into the mywifiext.com page due to a web browser issue. In such conditions, you can use a different browser.
The above were the requirements to set up a Netgear wifi range extender. Let’s go ahead with the procedure to configure your extender.
Mainly there are two methods to install a Netgear wifi range extender which are as follows:
- Web browser setup (Manual setup).
- Wireless protected setup (WPS).
In this blog we will learn about both the methods to setup a Netgear extender.
Table of Contents
Mywifiext extender setup: Manual method
Manual setup is the first method to install your Netgear range extender.This method is also known as web browser configuration. Here are the steps to setup your extender manually:
- Turn on your Netgear extender.
- Connect your repeater to the existing wifi.
- Open a web browser like chrome,mozilla firefox e.t.c.
- Visit www.mywifiext.com website.
- Now you are on mywifiext login page.
- Create a login account.
- Choose the network name that you want to expand.
- Tap on Finish to complete the setup process.
- Now you can place the extender at your desired location having dead spots.
In this way you can configure your Netgear extender via manual setup or you can say that web browser setup.In the next blog we will talk about the wireless protected setup (WPS).
Netgear extender Setup: WPS Method
Let’s get more familiar with another way to setup your Netgear wifi range extender,which is also called as the most fast and easy method to install your extender. Wireless protected setup (WPS) does not require any password,username or SSID.You can simply configure your wifi booster by pressing a button only. Let’s see how it is done.
To setup your extender via WPS method go through these steps:
- Plugin your netgear extender and turn it on.
- Make sure that your booster is connected to the existing router.
- When the power LED on your repeater turns stable green.
- Press the WPS button on your netgear extender.
- After a minute press the same WPS button on the existing router as well.
- After two minutes if the light status on the repeater is solid green.
- That means you have performed the WPS setup successfully.
That’s how you can install your netgear extender within two minutes only via the WPS method.
Step-by-step guide for Netgear Orbi AX6000 setup
Step-by-step guide for Netgear Orbi AX6000 setup Your experience with a smart home is raised by the WiFi 6 mesh network, the Netgear Orbi AX6000.
A Complete Guide to Fix Netgear POE Switch Problems
A Complete Guide to Fix Netgear POE Switch ProblemsThe networking feature known as POE, also called Power over Ethernet, is described by the IEEE 802.3af
Netgear Extender Access Point Setup
Netgear Extender Access Point Setup: A Complete Guide New Extender Setup Netgear WiFi range extenders allow users to connect to their routers from anywhere in
Netgear Nighthawk AXE11000 Router Setup
Netgear Nighthawk AXE 11000 Router SetupDo you have a thing for Netgear devices? Is that a yes? When did you most recently bring a new
How to activate access control on a Netgear wifi extender?
How to activate access control on a Netgear wifi extender?Access control is a security method that limits who or what can access resources in a
Troubleshooting Tips for Netgear Authentication Error
Troubleshooting Tips for Netgear Authentication Error When Netgear users are unable to connect to wireless because they have forgotten their Netgear extender default password, an
Quick Troubleshooting Techniques for Mywifiext Not Loading Error
If you are experiencing issues with Mywifiext not loading, there are a few troubleshooting techniques that you can try to resolve the issue quickly. Mywifiext
Netgear Nighthawk XR1000 Router
Netgear Nighthawk XR1000 Router Setup New Extender Setup The Nighthawk XR1000 Pro gaming router was created with maximum gaming performance in mind. Furthermore, the Nighthawk
Netgear EX7500 Setup
NETGEAR EX7500 SETUP | AC2200 NETGEAR EX7500 Setup: When it comes to wireless mesh extenders, nothing can beat the competency of the Nighthawk X4s AC2200.
How to fix Netgear extender firmware update failure issue?
How to fix Netgear extender firmware update failure issue? A frequent Netgear extender firmware update is required for your Netgear extender to function properly. However,
Click here for more information about:
How to update the firmware using mywifiext.com?
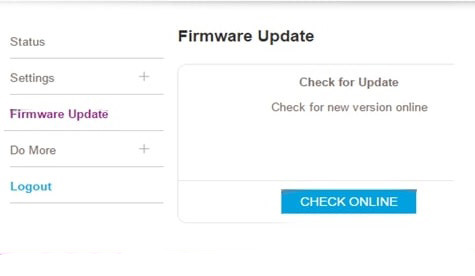
To maximize product performance, security, and usefulness after mywifiext login, keep your wireless range extender firmware up to date. The simplest technique for upgrading extender firmware is to perform the following steps:
- Connect your wifi extender to the power source.
- Allow a few minutes for the WiFi extender’s LED to turn solid green.
- Now open any web browser on your desktop.
- For more information, visit mywifiext.com or mywifiext.local.
- You will be sent to the Netgear extender configuration window.
- Enter the default extender login credentials.
- Select the ‘LogIn’ option.
- From the drop-down option, choose ‘Administration.’
- Choose ‘Firmware Update’ from the menu.
- Tap on the ‘Yes’ option if updated firmware is available.
The latest firmware will be downloaded and installed on your WiFi range extender right away. If you run into any difficulties, please reach us by calling on our toll free number.
How to change my username and password using mywifiext?
The procedure to change the username and password using mywifiext is quite simple.In this blog we will discuss about the detailed steps to complete this procedure which are as follows:
- Open your preferred web browser.
- Visit www.mywifiext.com page.
- Type your username and password.
- Hit the login button.
- Open the password settings.
- On the screen, new username and password options will display.
- Type here the username and password that you want to set.
- At last click on save option.
Click here for more information about:
Can’t access mywifiext.com and how to fix it?
Do you commonly experience the ‘can’t access mywifiext.net’ error when attempting to log in to your Netgear WiFi extender? You are, however, not alone! Users all over the world are experiencing the same problem. But don’t worry! In this piece, we’ve included the top four tips that will definitely enable you to access mywifiext.net without difficulty. So, let’s get this party started.
Factors Contributing to Your Inability to Access Mywifiext.net
There could be a number of reasons why you are unable to visit mywifiext.net. Some of the most common explanations are given below:
- Your internet connection is poor.
- Your Netgear extender’s connection to your home router is inconsistent.
- You have not entered the correct URL address into your web browser’s address box.
- Your range extender’s firmware is either out of date or corrupted.
- Your Netgear device’s WiFi signals are being disrupted.
- Technical issues may potentially prevent you from visiting mywifiext.net.
Are you totally aware of the reasons why you are unable to use mywifiext? Good. You are now ready to investigate the problem.
Fixed: Can’t access mywifiext.net
The following suggestions will undoubtedly assist you in troubleshooting the ‘can’t access mywifiext.net’ issue:
- Use the Proper Web Address
Begin by double-checking the web address you typed into your internet browser’s address bar. Many users make the mistake of typing in the incorrect web URL. You’ve most likely made the same error. It is recommended that you use the correct Netgear extender web address to resolve the issue.
Also, if you’re using an Apple device to access your WiFi range extender, use mywifiext.local instead of mywifiext.net.
- Examine your internet Connection
If there is an internet problem on your Internet Service Provider’s end, you may be unable to access mywifiext. As a result, request that your ISP resolve the problem as quickly as feasible. If nothing appears to be amiss on his end, examine the connection between your extender and router.
Is the link between your devices unstable? If this is the case, ensure that the Ethernet cable connecting them is in good condition.
- Update the Firmware
Updating the firmware on your Netgear extender to the most recent version can also help you with the ‘can’t access mywifiext.net’ problem. So, what are you holding out for? Perform an immediate Netgear firmware upgrade!
Are you unsure how to proceed? Not a problem! Please contact one of our knowledgeable technical professionals.
They will supply you with all of the instructions you need to update the firmware on your WiFi device.
- Restart Your Netgear extender
Your Netgear WiFi range extender may require a restart from time to time to avoid technical issues such as ‘can’t access mywifiext.net’.
- Perform a factory reset.
If none of the troubleshooting steps above helped you resolve the ‘can’t access mywifiext.net’ issue, it’s time to do a Netgear default factory reset.
Here’s hoping that the troubleshooting suggestions in this post helped you resolve the ‘can’t access mywifiext.net’ problem. If you’re still having trouble, don’t be afraid to contact our technical support team. They are available to you 24 hours a day, seven days a week.